


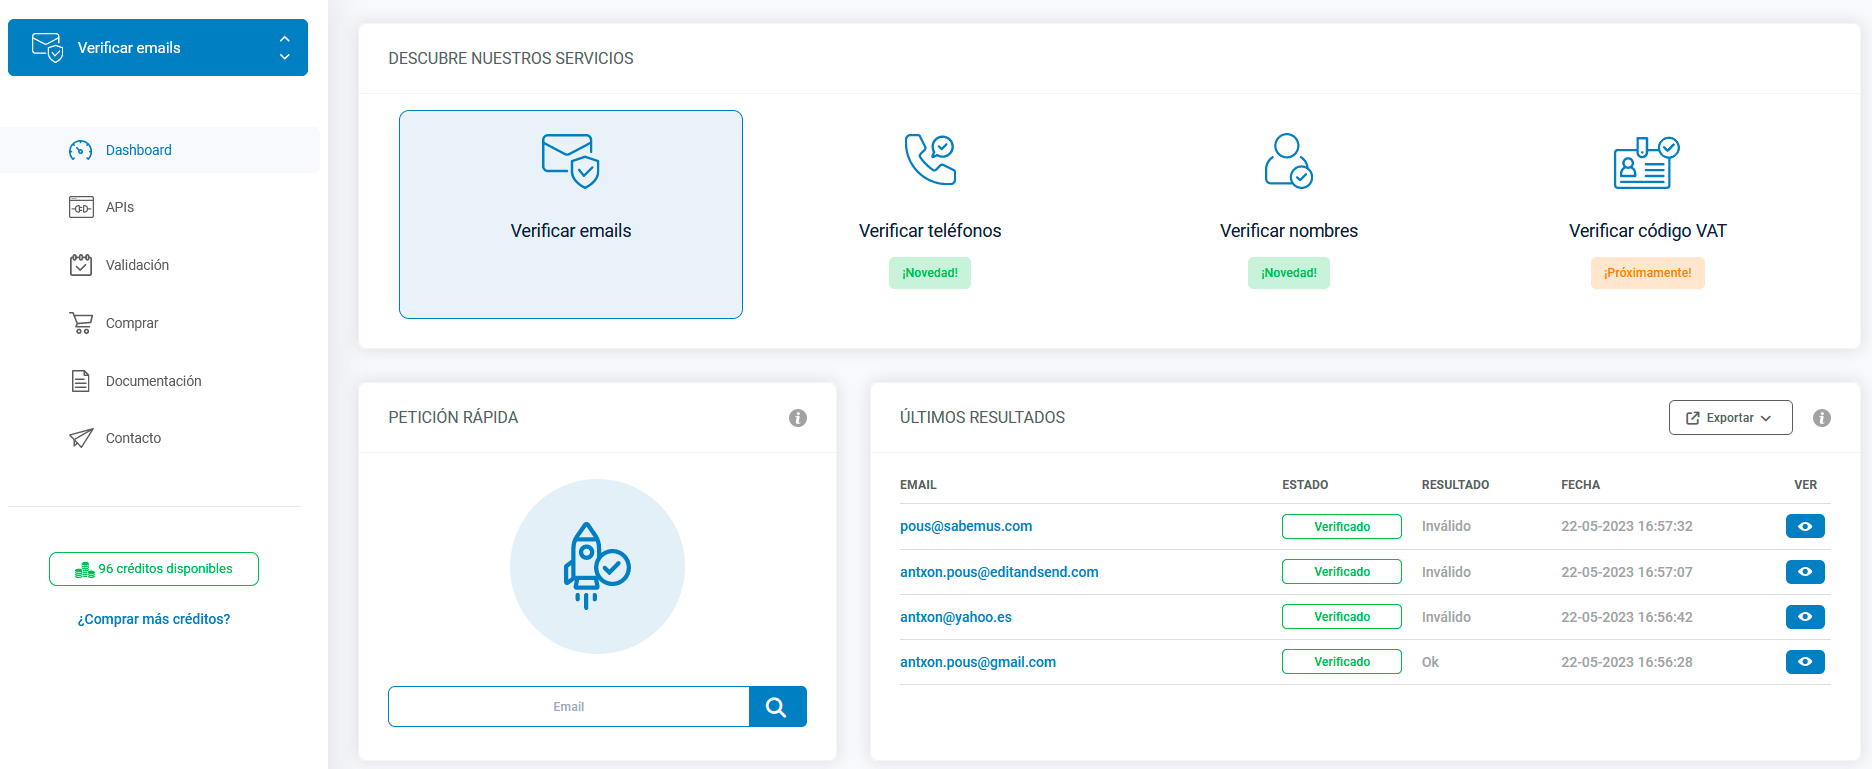
In today’s digital world, email communication plays a key role in our personal and professional lives. However, there is nothing more frustrating than sending an important e-mail only to discover that the e-mail address is incorrect or that the recipient does not exist. This is where the key tool comes into play: the“mail checker“. Remember that you can evaluate our mail validator by registering in our portal.
An email verifier, as its name suggests, is an essential tool that allows you to validate the authenticity and validity of an email address. In other words, it acts as an email communication gatekeeper, making sure your messages reach their destination without any problems.
In this guide, we will explore in detail what a mail checker is, how it works and why it is a must-have tool for both individuals and businesses that want to keep their contact list error-free and maximize efficiency in their email communications.
Read on to find out how you can avoid email errors and improve your online interactions with the help of an email checker!
How a mail verifier works
A mail verifier, also known as an email address verifier or email validator, is a tool used to check the authenticity and validity of an email address. Its operation is based on a series of processes that help determine whether an e-mail address is viable and whether messages sent to that address are likely to be successfully delivered. Here’s how a mail verifier works:
Syntax and Format: The mail verifier first checks if the e-mail address has a valid format. Check if it contains the essential elements, such as a user name, the “@” symbol and the domain name. It also ensures that there are no typographical errors, such as extra blank spaces or invalid characters.
Domain Verification: The tool queries the DNS (Domain Name System) records of the domain associated with the email address. This is crucial to confirm that the domain exists and is configured correctly. If the domain is invalid or has no DNS records, the email address is considered invalid.
Verification of Mail Server Existence: The mail checker attempts to establish a connection to the mail server associated with the domain. If the server does not respond or does not exist, the e-mail address is considered invalid. This helps to eliminate addresses that are not in use or are inaccessible.
Disposable Account Verification: Some email verifiers also identify temporary or disposable email addresses, which are commonly used for temporary or fraudulent purposes. These addresses are usually rejected.Blacklist Verification: Some mail verifiers query databases of known spam or fraudulent email addresses. If an e-mail address is blacklisted, it is considered invalid.
Potential Deliverability Validation: In addition to confirming the validity of an e-mail address, some mail checkers attempt to determine whether e-mails sent to that address are likely to be successfully delivered. This may involve checking mailbox capacity or previous delivery history.
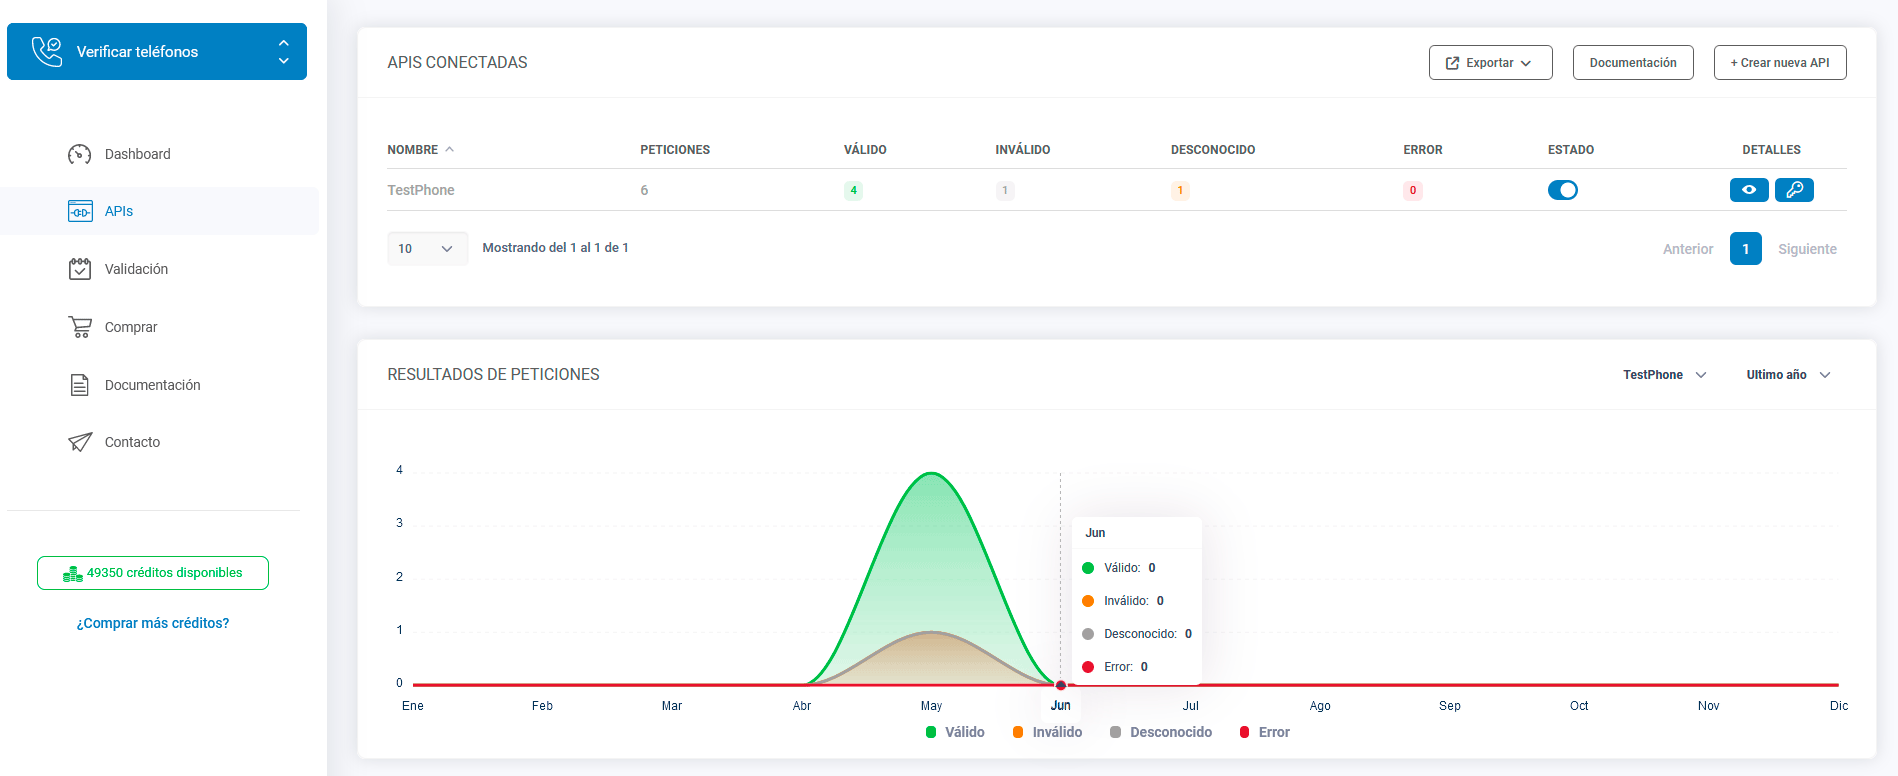
Validation Results: The mail verifier provides detailed results after verification. This may include information about the syntax, the existence of the domain, the server response and the general validity of the e-mail address.
In short, a mail verifier works by performing a series of checks to determine whether an email address is valid and whether emails sent to that address are likely to reach their destination. This is essential for keeping mailing lists clean and improving the effectiveness of email communications by reducing bounce rates and increasing successful message delivery.
How to use an API as a mail validator
If we want to automate the mail validation process we must use an API. Using an API as an email validator is a process that involves sending requests to the API with the email addresses you wish to validate and receiving responses that indicate the validity of those addresses. Below, I’ll walk you through the general steps for using an email validation API:
-
Register and get access to the API:
- Look for an email validation service that offers an API. We recommend you to Register at Verificaremail. You have free credits to evaluate the quality of the service.
- Obtain API credentials, which usually include an API key or other type of authentication token. These credentials will allow you to access the API. Our email validation platform allows you to create them automatically.

-
Select a programming language:
- Choose the programming language you will use to interact with the API.
-
Enter the request code:
- Use the API credentials to authenticate to the service API.
- Write the code to send an HTTP request to the API with the email address you want to validate. The request is generally made via a POST or GET request to a specific URL provided by the service.
-
Process the response:
- The API will respond with information about the email address you provided. This response may include data such as address validity, syntax, domain existence and more, depending on the API and plan you are using.
- Write code to process the API response and extract the relevant information for your application.
-
Error handling and results:
- Implements proper error handling to deal with situations where the API is unable to validate the email address for some reason, such as connectivity issues or usage limits.
- Decide how you want to use the validation results in your application. You can choose to store validated addresses, delete invalid addresses, or take other actions according to your needs.
-
Control of rates and limits:
- Check the API documentation for details on fees, usage limits. This is important to avoid unexpected costs and to ensure that you comply with the terms of service.
-
Testing and monitoring:
- Before implementing email validation in your production application, perform extensive testing to ensure that the integration works properly.
- Set up continuous monitoring to oversee the performance and accuracy of email validation in your application.
Remember that email validation APIs may vary in terms of features and results provided. Consult the documentation for the specific API you are using to fully understand how it works and what information you can expect from it.
To apply an email verification API using JavaScript, you must first gain access to the API and obtain the necessary credentials. Once you have access to the API and have your credentials, you can follow these general steps to use it in your JavaScript project:
Get your API credentials: Make sure you have your API credentials ready, usually in the form of an API key or some other authentication token provided by the email verification service.
Configure your development environment:
– Make sure you have Node.js installed on your system if you are developing in the server environment. You can download it from [el sitio web oficial de Node.js](https://nodejs.org/).
– If you are developing in the browser, you do not need to install anything additional.
Install the necessary dependencies: If you are developing in Node.js, install any libraries or modules needed to make HTTP requests, such as “axios” or “node-fetch”. You can do this by using the following command in your project:

If you are developing in the browser, you do not need to install additional dependencies.
Write the request code: You can then write the code to make a request to the email verification API. Be sure to include your access key or authentication token in the request. Here is an example of how to do it using the “axios” library:
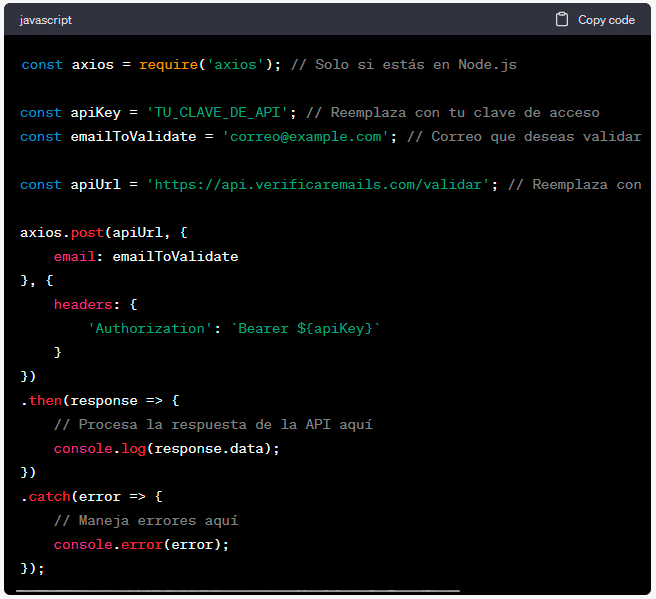
This is a basic example and you will have to adjust the code according to the specific API you are using. Be sure to follow the documentation provided to understand the parameters and expected responses.
Process the API response: Once you receive the API response, process the data according to your needs. The response will generally contain information about the validity of the e-mail and other relevant details.
Handles errors: Implements proper error handling to deal with any problems that may occur during the API request, such as authentication errors or connectivity issues.
Test and debug: Perform extensive testing to ensure that the integration is working properly. Use JavaScript debugging tools to identify and fix problems if necessary.
Note that this example uses the “axios” library to perform HTTP requests in Node.js. If you are developing in the browser, you can use “fetch” or another equivalent library to perform the HTTP requests.
Be sure to consult the specific documentation for the email verification API you are using for details on how to construct requests and process responses accurately.
How to generate your email verifier code automatically using Postman
To generate the code in Postman to use an email verifier via a REST API and send the necessary parameters, follow these steps:
Download and install Postman:
If you do not already have Postman installed, you can download and install it from [el sitio web oficial de Postman](https://www.postman.com/downloads/).
Create a new request:
Open Postman and create a new request by clicking on the “New” button in the upper left corner and select “API Request”.
Set up the application details:
In the “Application” tab, fill in the basic information for your application. This includes the HTTP method (e.g., POST), the URL of the API you wish to access, and any required headers, such as the authentication header if necessary.
Add the parameters:
In the “Body” tab, select the type of data you are sending, such as JSON or form. Then, add the specific parameters required by the email verification API. This could include an “email” field for the email address you wish to validate.
Submit the request:
Once you have configured all the details of the request and added the parameters, you can click on the “Submit” button to send the request to the API.
Get the API response:
After submitting the request, Postman will display the API response at the bottom of the window. This will include information about the validity of the email and any other relevant data returned by the API.
Generate the code:
To generate code from your Postman request, click on the “Code” button located next to the API response in the upper right corner of the Postman window.
Select the programming language you plan to use for your application. Postman will provide you with the corresponding source code to perform the same request from your code.
Copy and paste the generated code:
Copy the generated code and paste it into your development project in the language you have selected. Be sure to adjust any necessary values, such as the API URL and parameters, according to the needs of your application.
Test and adjust the code:
Test the code in your project and make adjustments as needed. Make sure you handle API responses and errors properly in your application.
This process allows you to use Postman to easily set up and test email verification API requests and generate code that you can use in your application to programmatically make these requests.


