logo

Prices Verify Names and Surnames

In this article you will learn how to use Zapier to verify emails in almost any application. You will discover the necessary steps to set up a Zap between Verificaremails and Google Sheets. Our online example has three main objectives: first, to extract each new email address from the spreadsheet; second, to use the Verifyemails email list cleaner to verify the new emails; and third, to return the results of the email verification to the spreadsheet. Remember that instead of Google Sheets, you can use the thousands of apps integrated with Zapier to verify email addresses, phone numbers, names or postal addresses.

In order to use Verificaremails with Zapier, certain requirements must be met.

Before you begin, you will need the following items:

  1. Register for free on Zapier. Although some features will be limited, this article will guide you through creating a Zap that works with a free Zapier account.
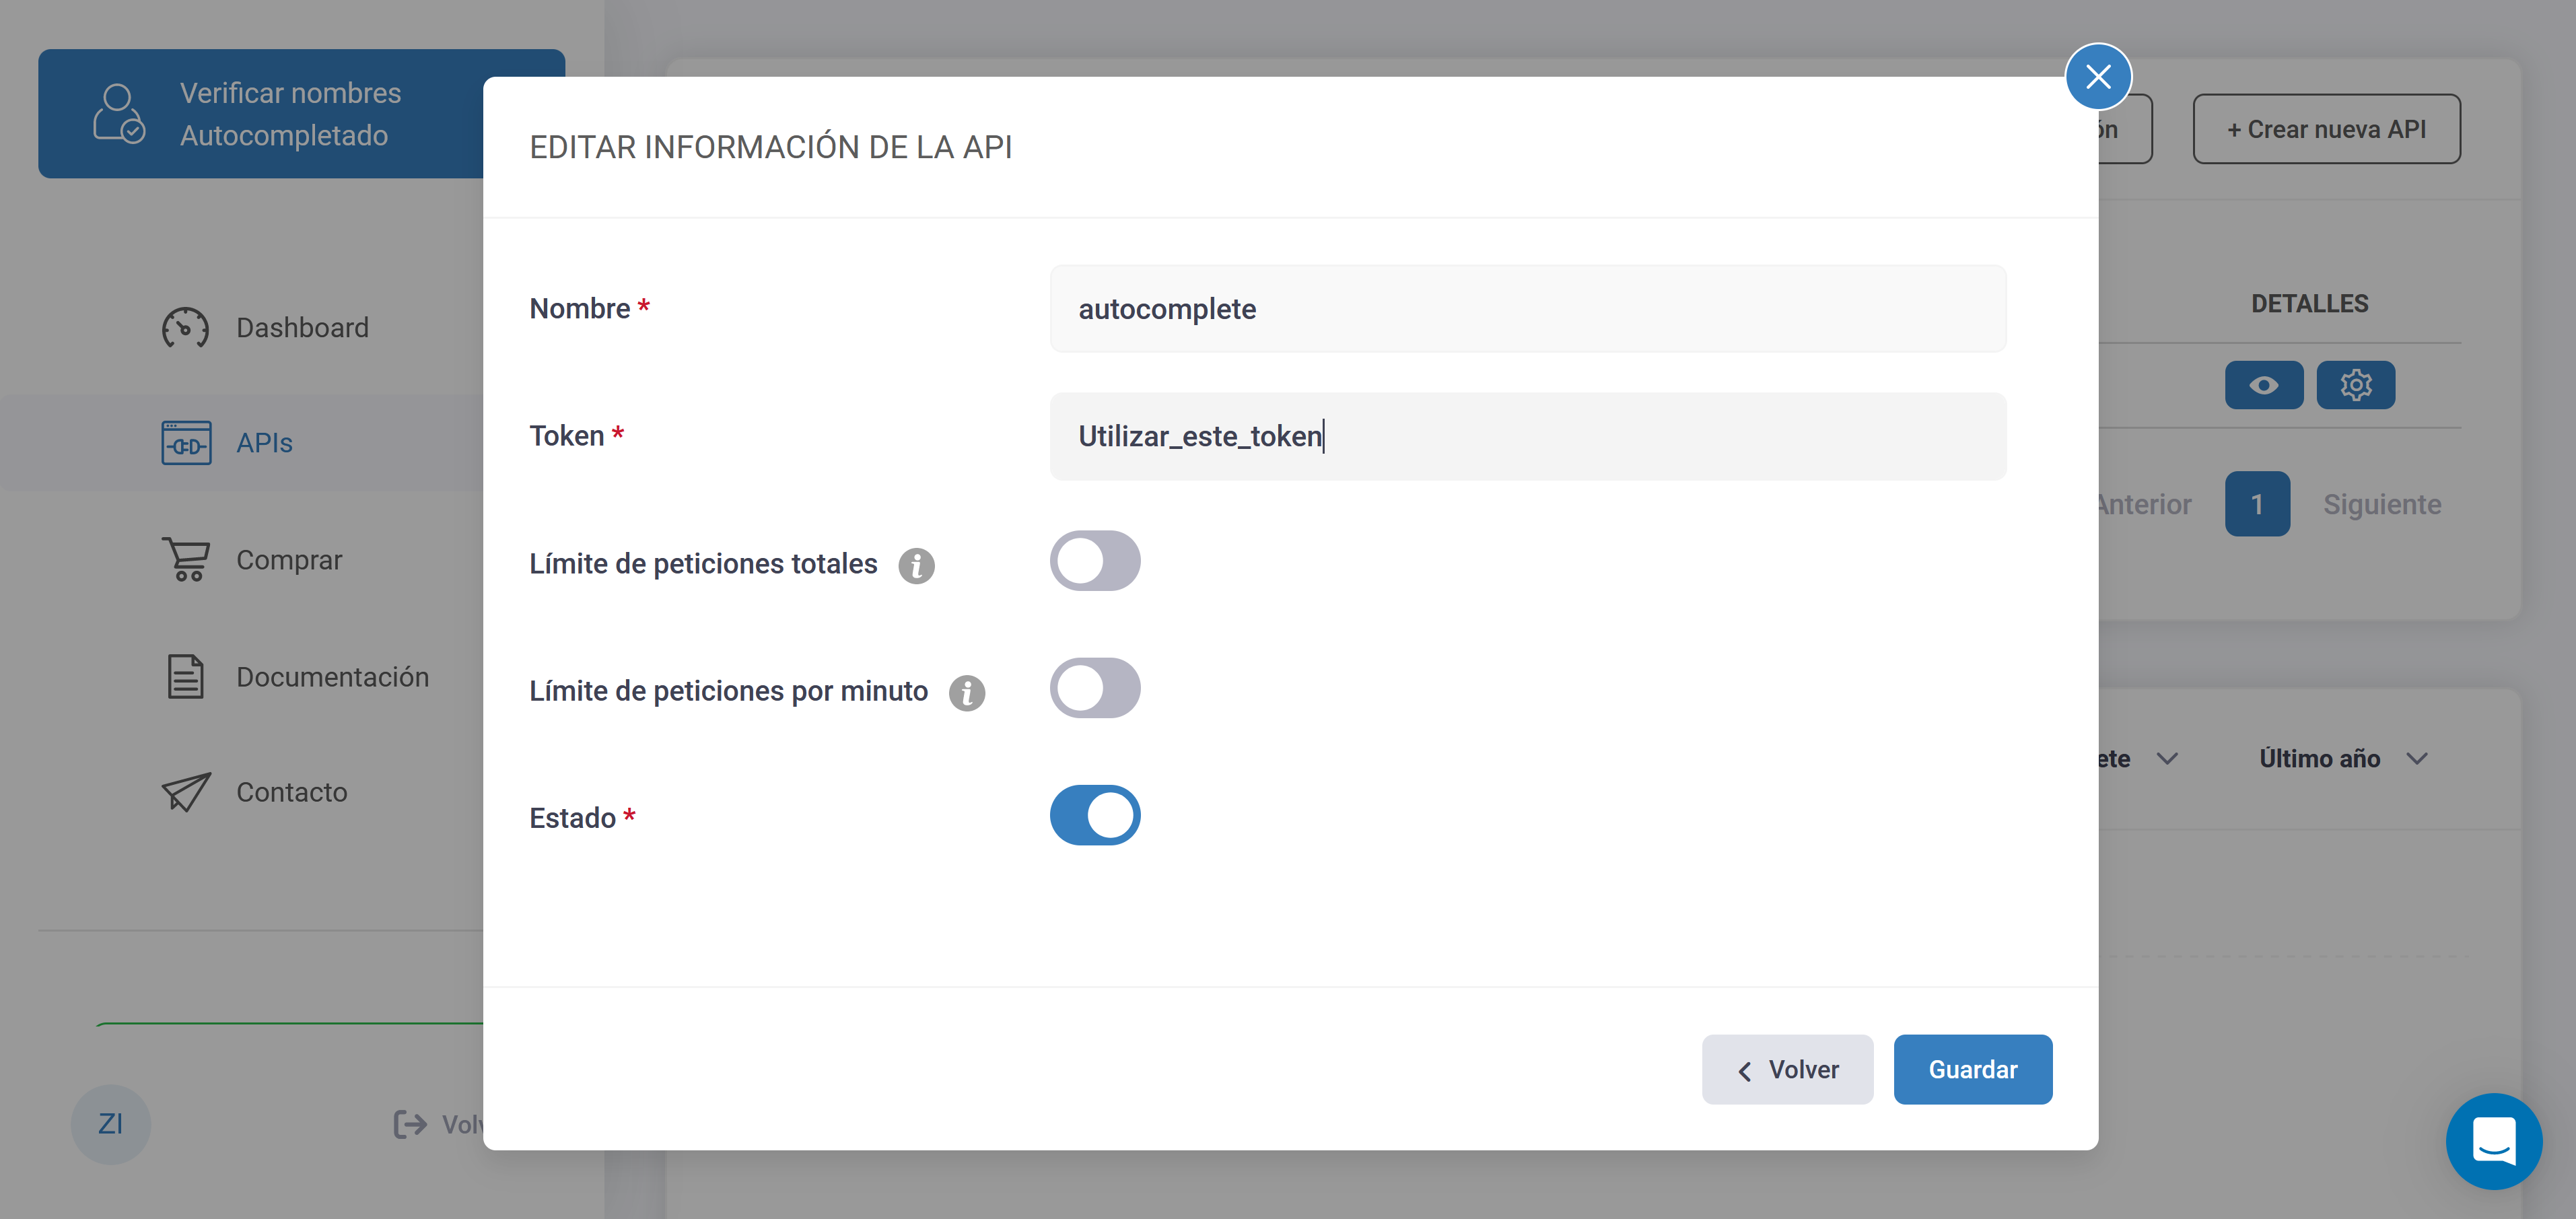
  2. Within your Verifyemails account, check the API section to create an API key for the email address verification service.
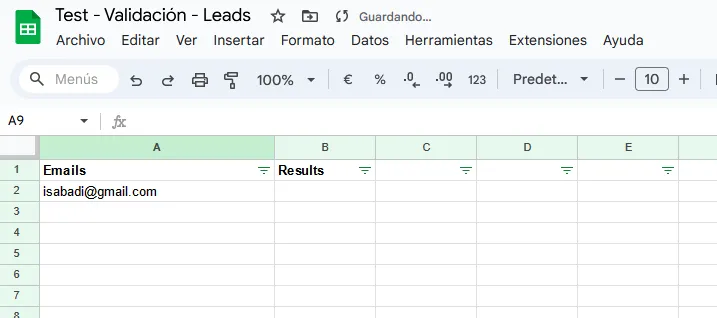
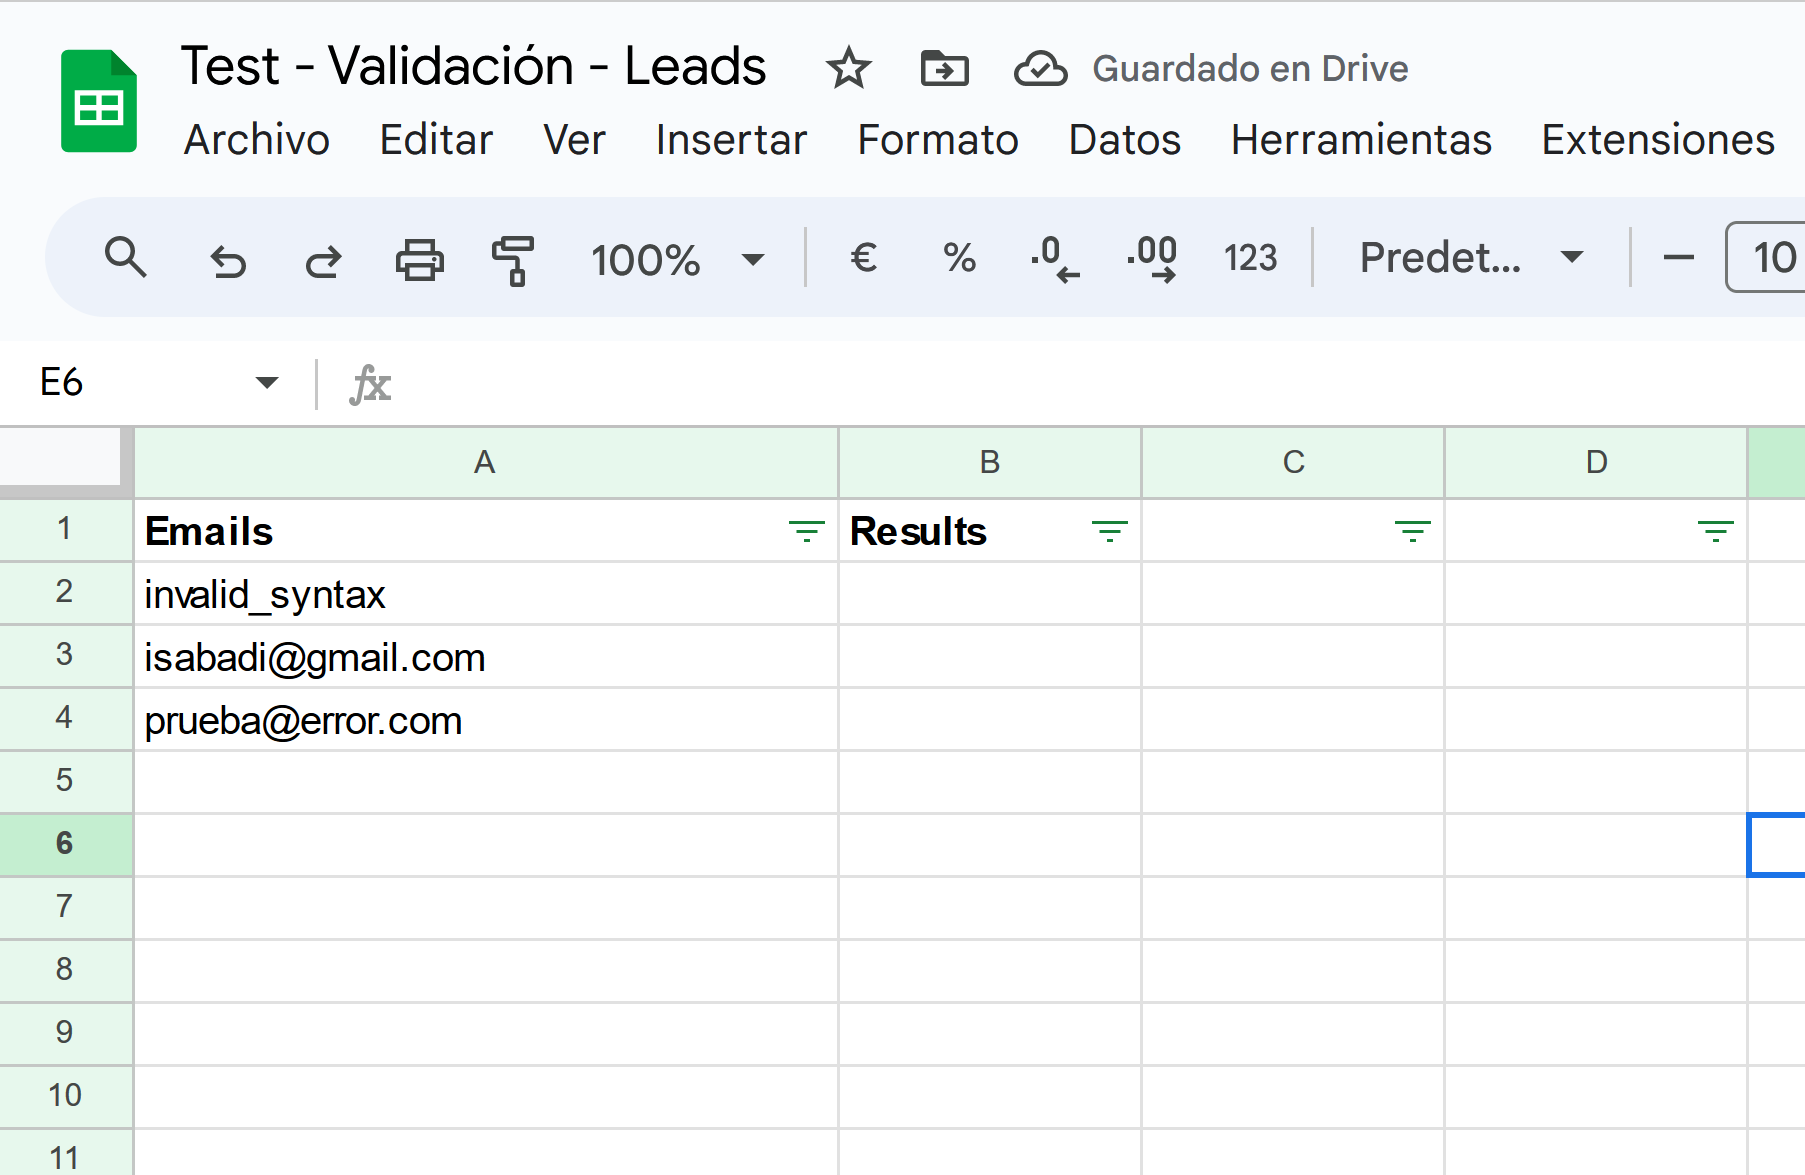
  3. For our Zap, a Google account and a Google Sheets spreadsheet are required. At startup, you will need to set up a series of columns with headers.
  4. E-mail destination point: This is where Zapier will receive e-mails.
With these credentials you can start creating your Zap and use Zapier to verify emails in Google Sheets.
Google Shhet to verify emails

Next, we will show you how to create a Zap step by step between Verificaremails and Google Sheets.

First, to get started, you will need to log in to your Zapier account.

Step 1: Log in with your Zapier account login to verify emails.

To create your Zap, click on the “+” icon in the top left corner of the page and then select “+ Create”.

Step 1 - Zap creation

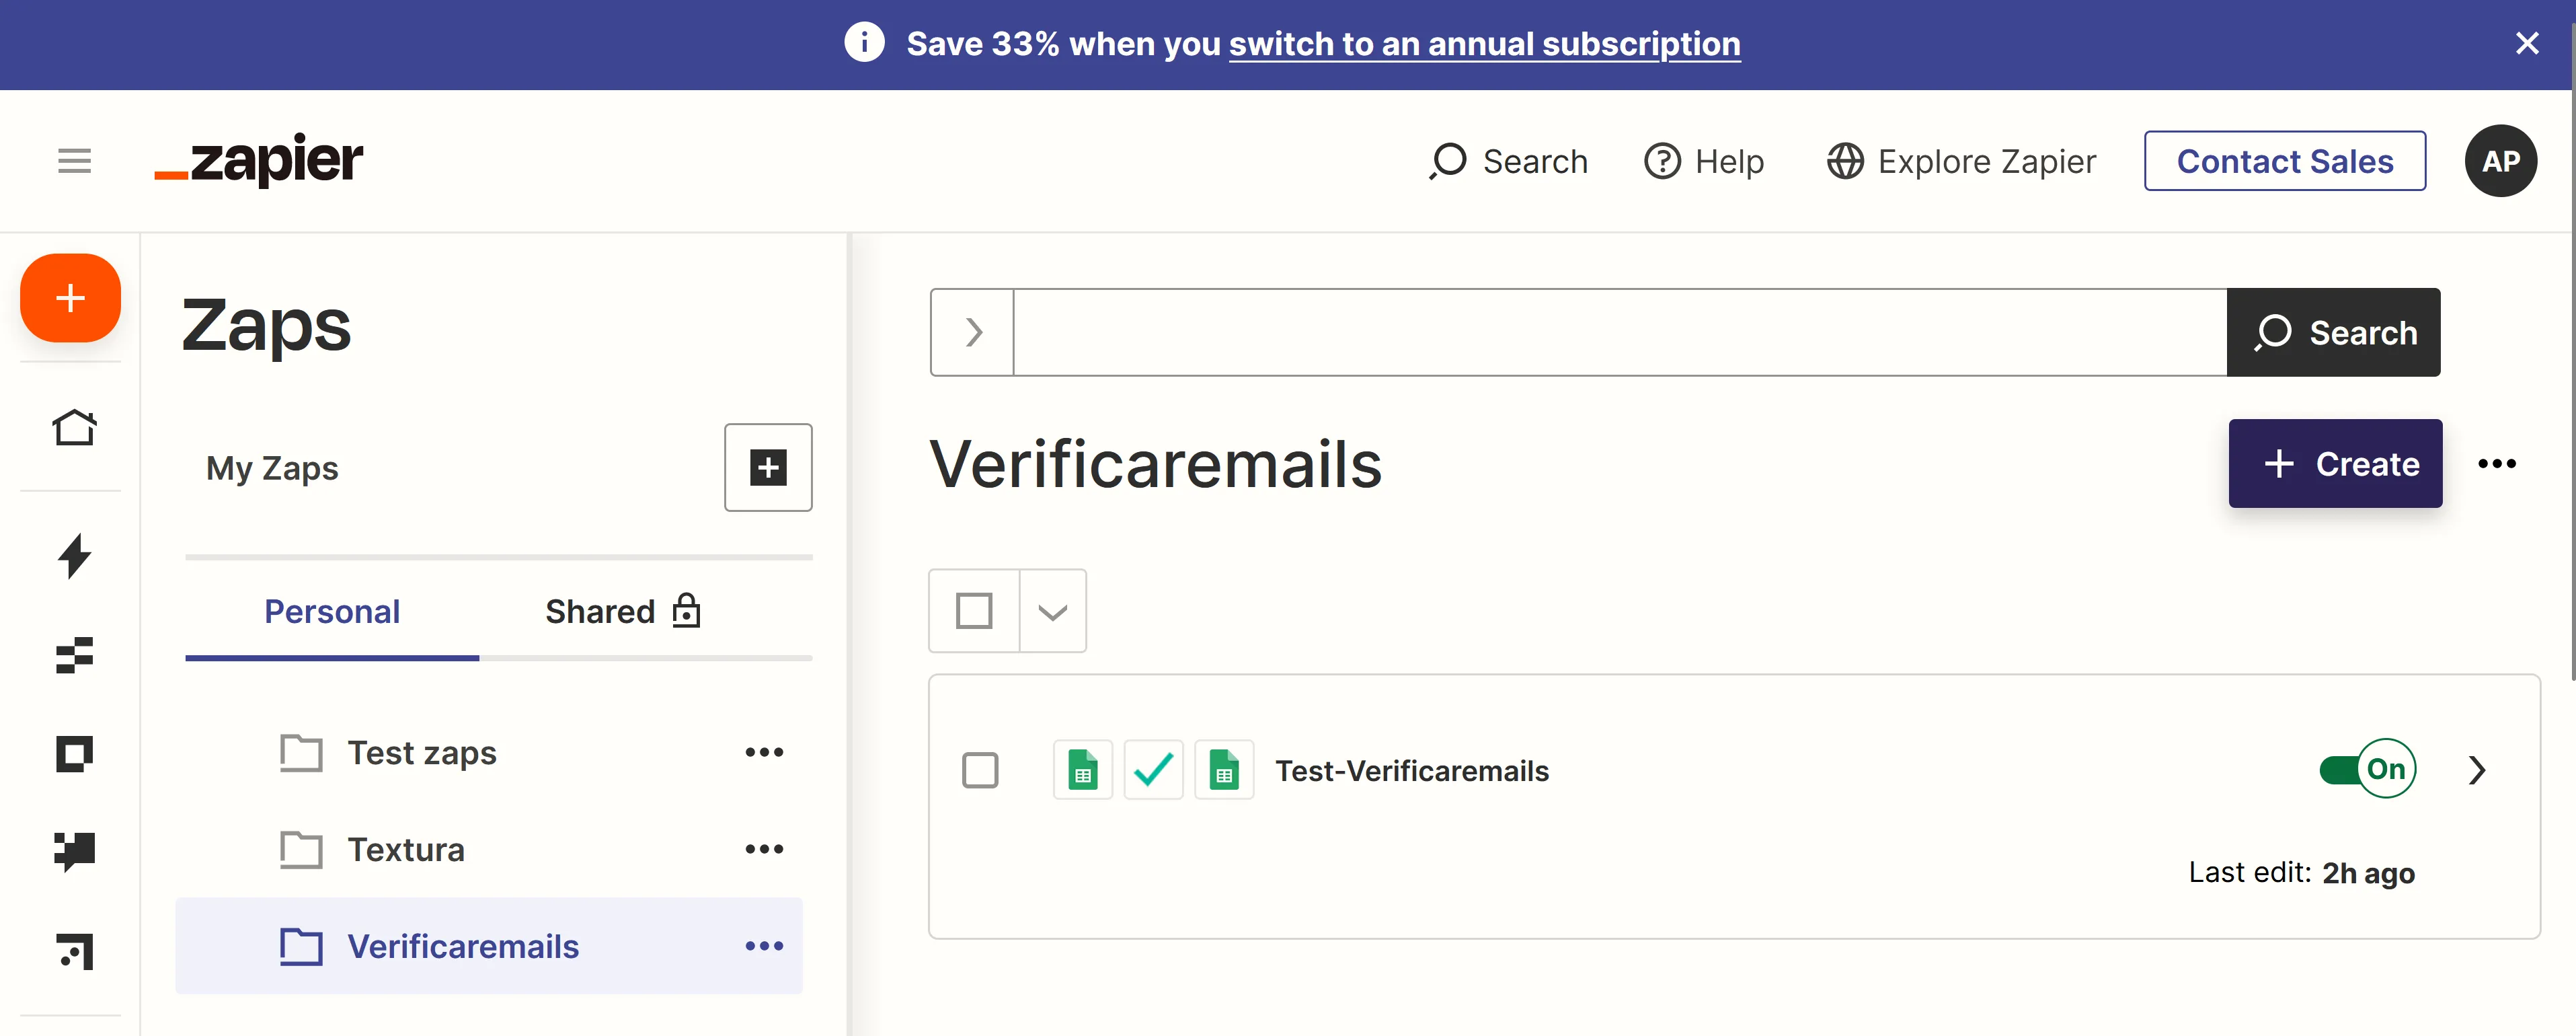
Step 2: Assign a name to your Zap

To identify your Zap, give it a name that identifies the service you integrate. Click on “Untitled Zap” to add the Zap name.

Step 3: Set the “Trigger” to trigger the response.

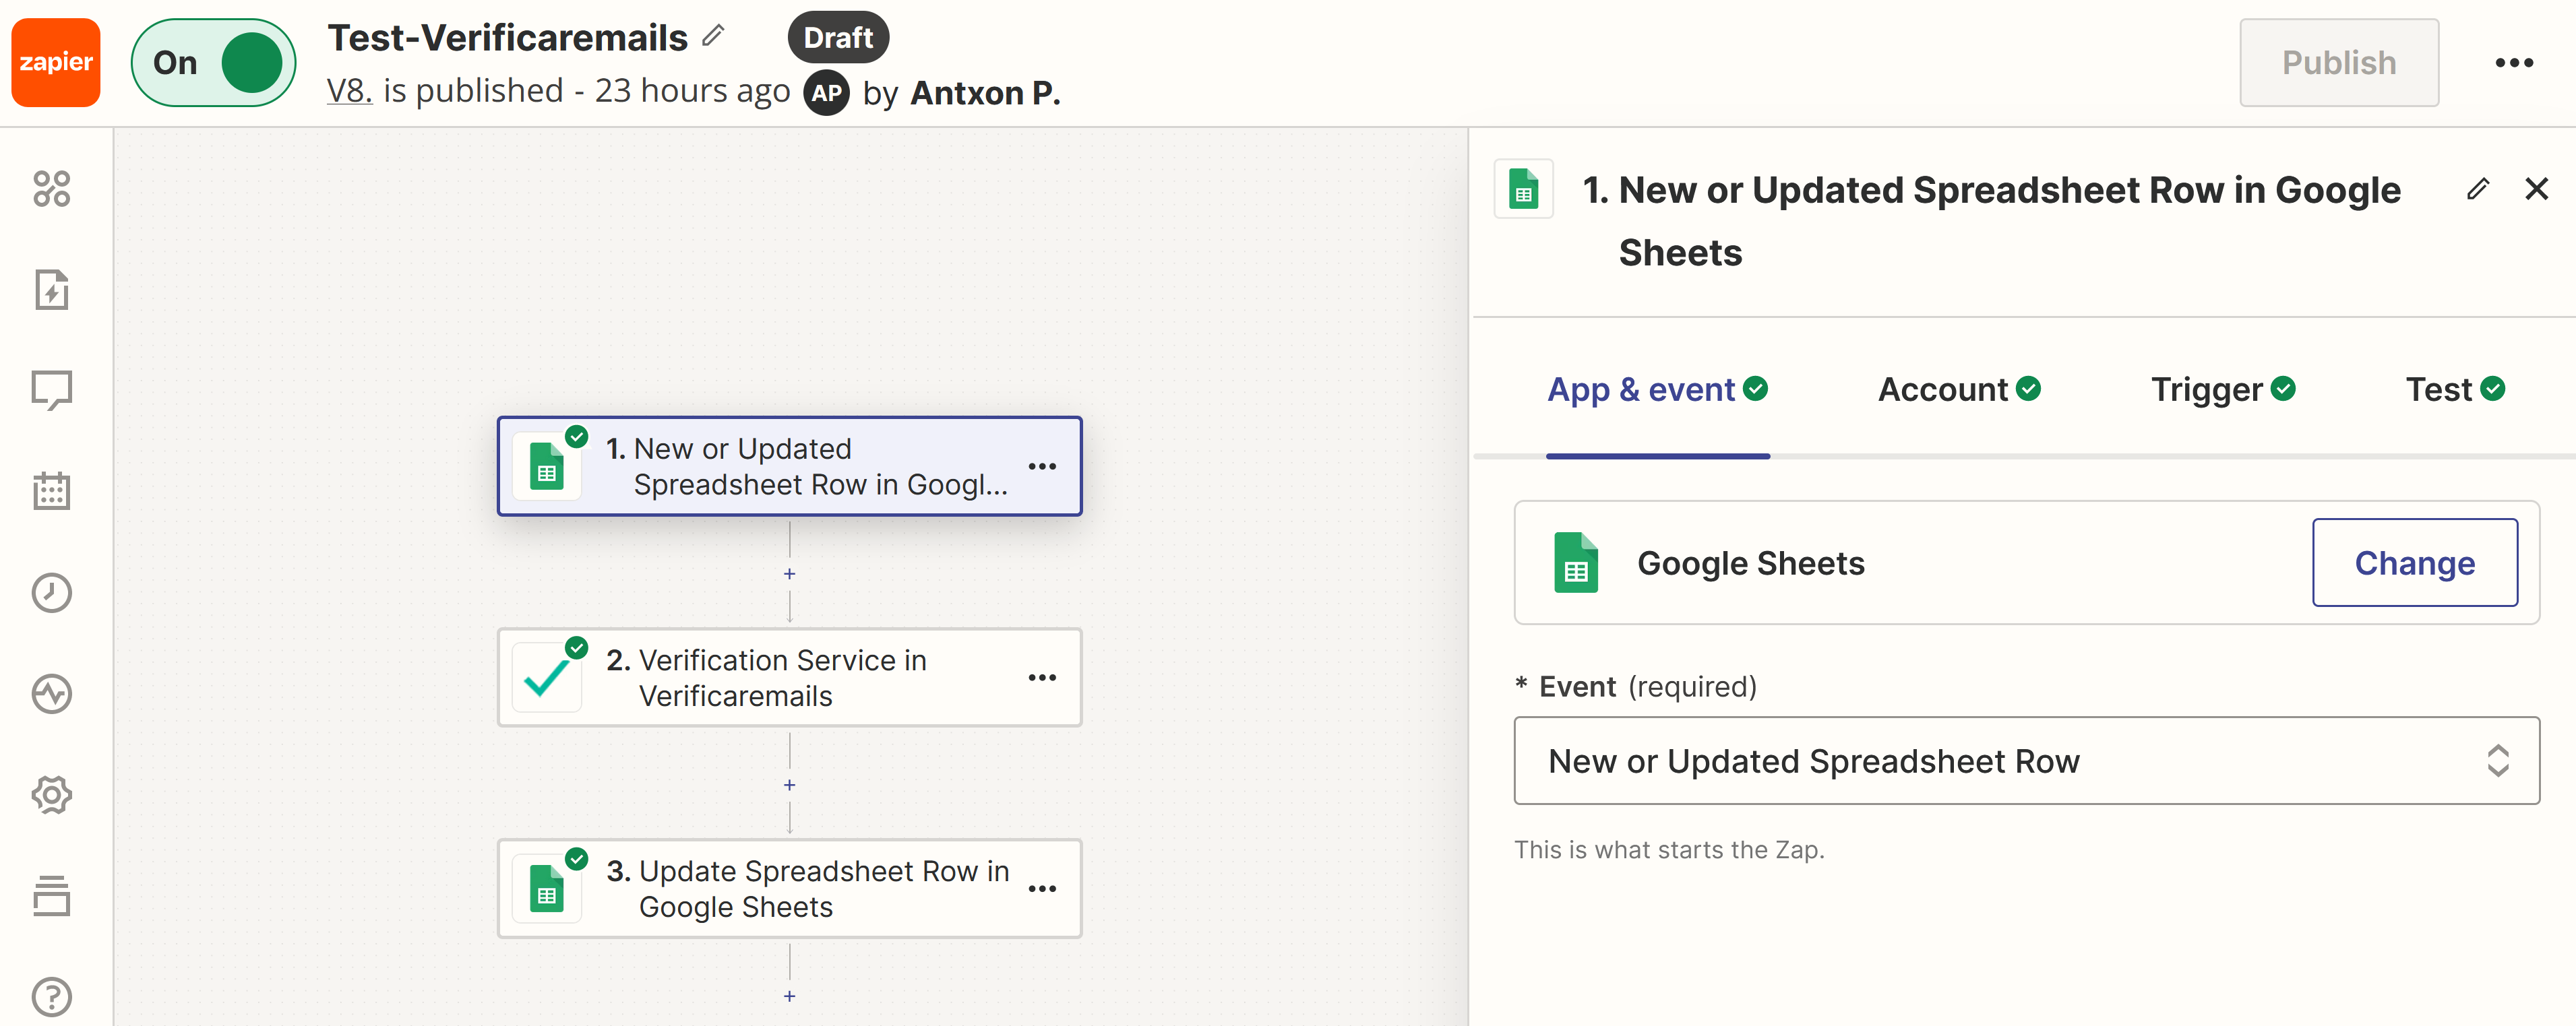
To begin, go to the “What would you like to automate?” section, then click on “Google Sheets”. If it does not appear, type “Google Sheets” in the field and select it from the list.

Step 3 - Set up Zapier trigger application

Next, choose the “New or Update Spreadsheet Row” option as the event that will trigger your Zap. Click on “Continue”.

Set up event on Zapier

Step 4: Link our zap with a Google Sheets account and be able to use Zapier to verify emails

To begin, click on “Choose account” and follow the steps to enter your Google credentials. Next, give Zapier permission to access your Google Spreadsheets.

Zapier link account

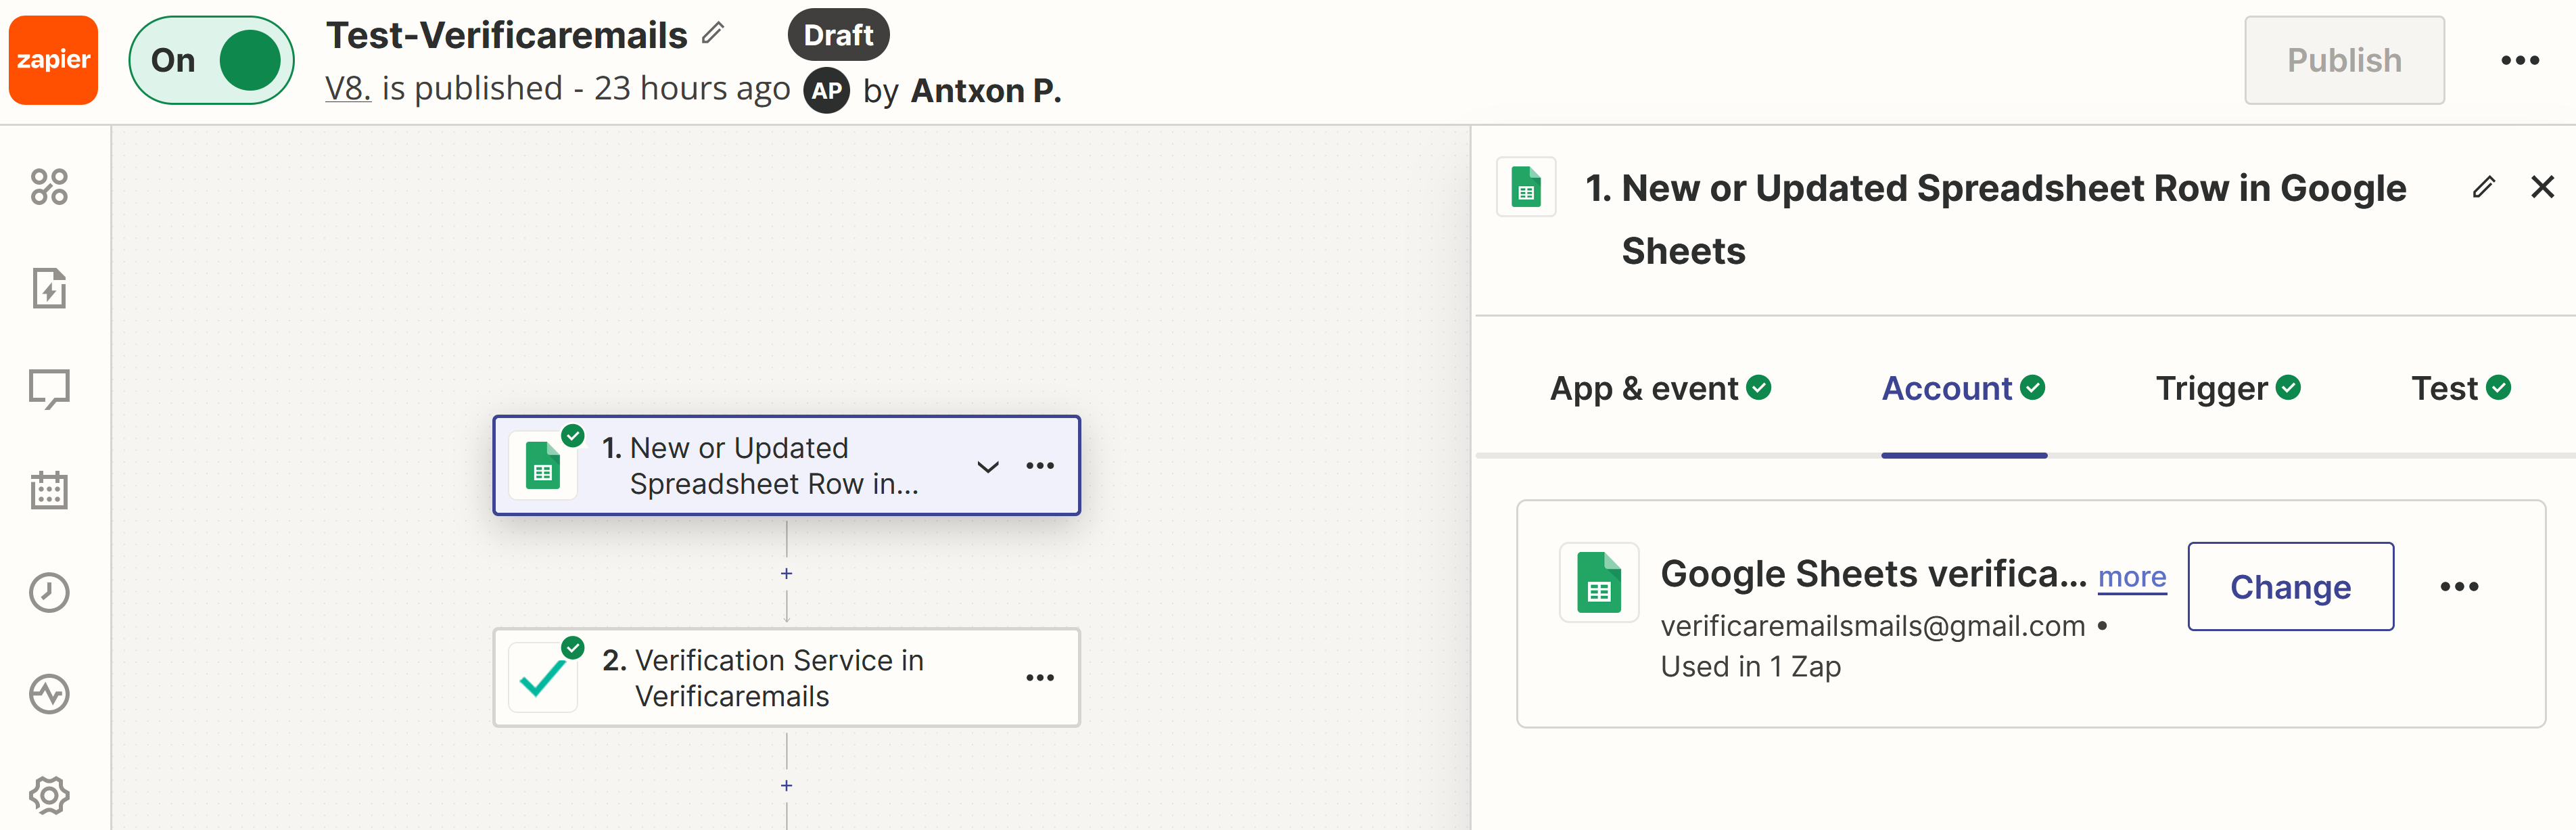
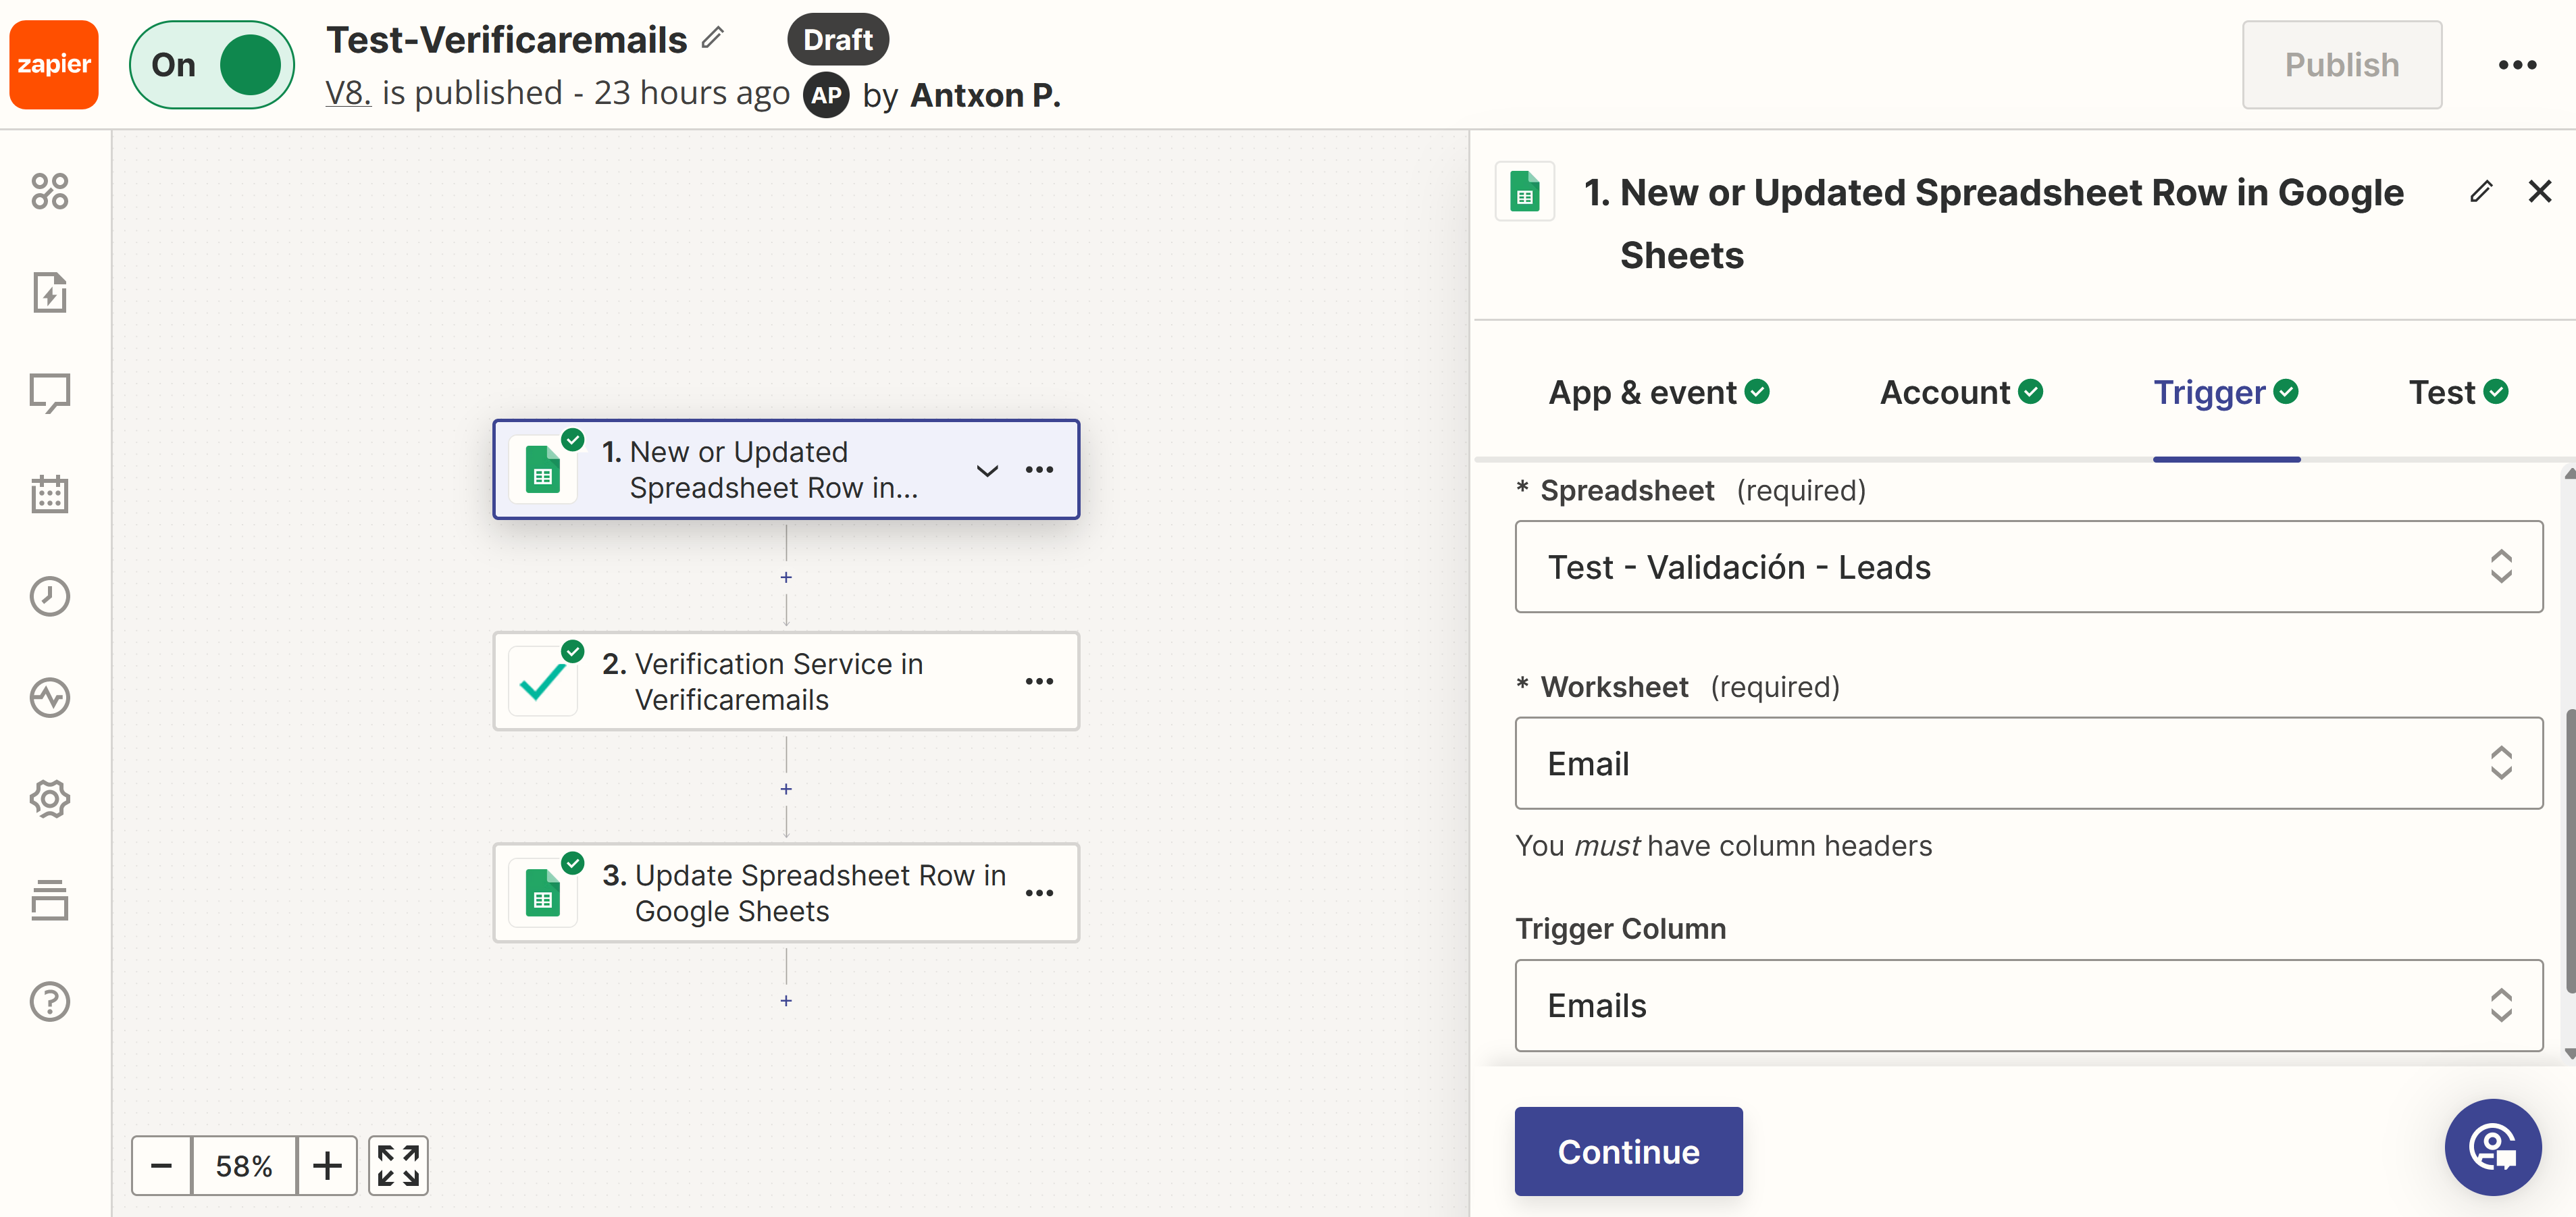
Step 5: Select the spreadsheet and the e-mail column

Choose the spreadsheet file you want to use. To do this, click on the drop-down icon next to the spreadsheet space and select the one you prefer. The system will automatically display all the spreadsheets you have saved in Google Drive.

Once you have selected the desired spreadsheet, choose the column containing the email addresses in your spreadsheet (check this in the Trigger column). Then click on “Continue”. In our case, the column containing the email addresses is called “Emails”.

Zapier - Select google Sheet

Step 6: To achieve a successful connection, it is important to dedicate time to the experiment and evaluate the results thoroughly. Make the necessary adjustments and continue to evaluate the results obtained. Keep going until the desired result is achieved.

Zapier - Test connection

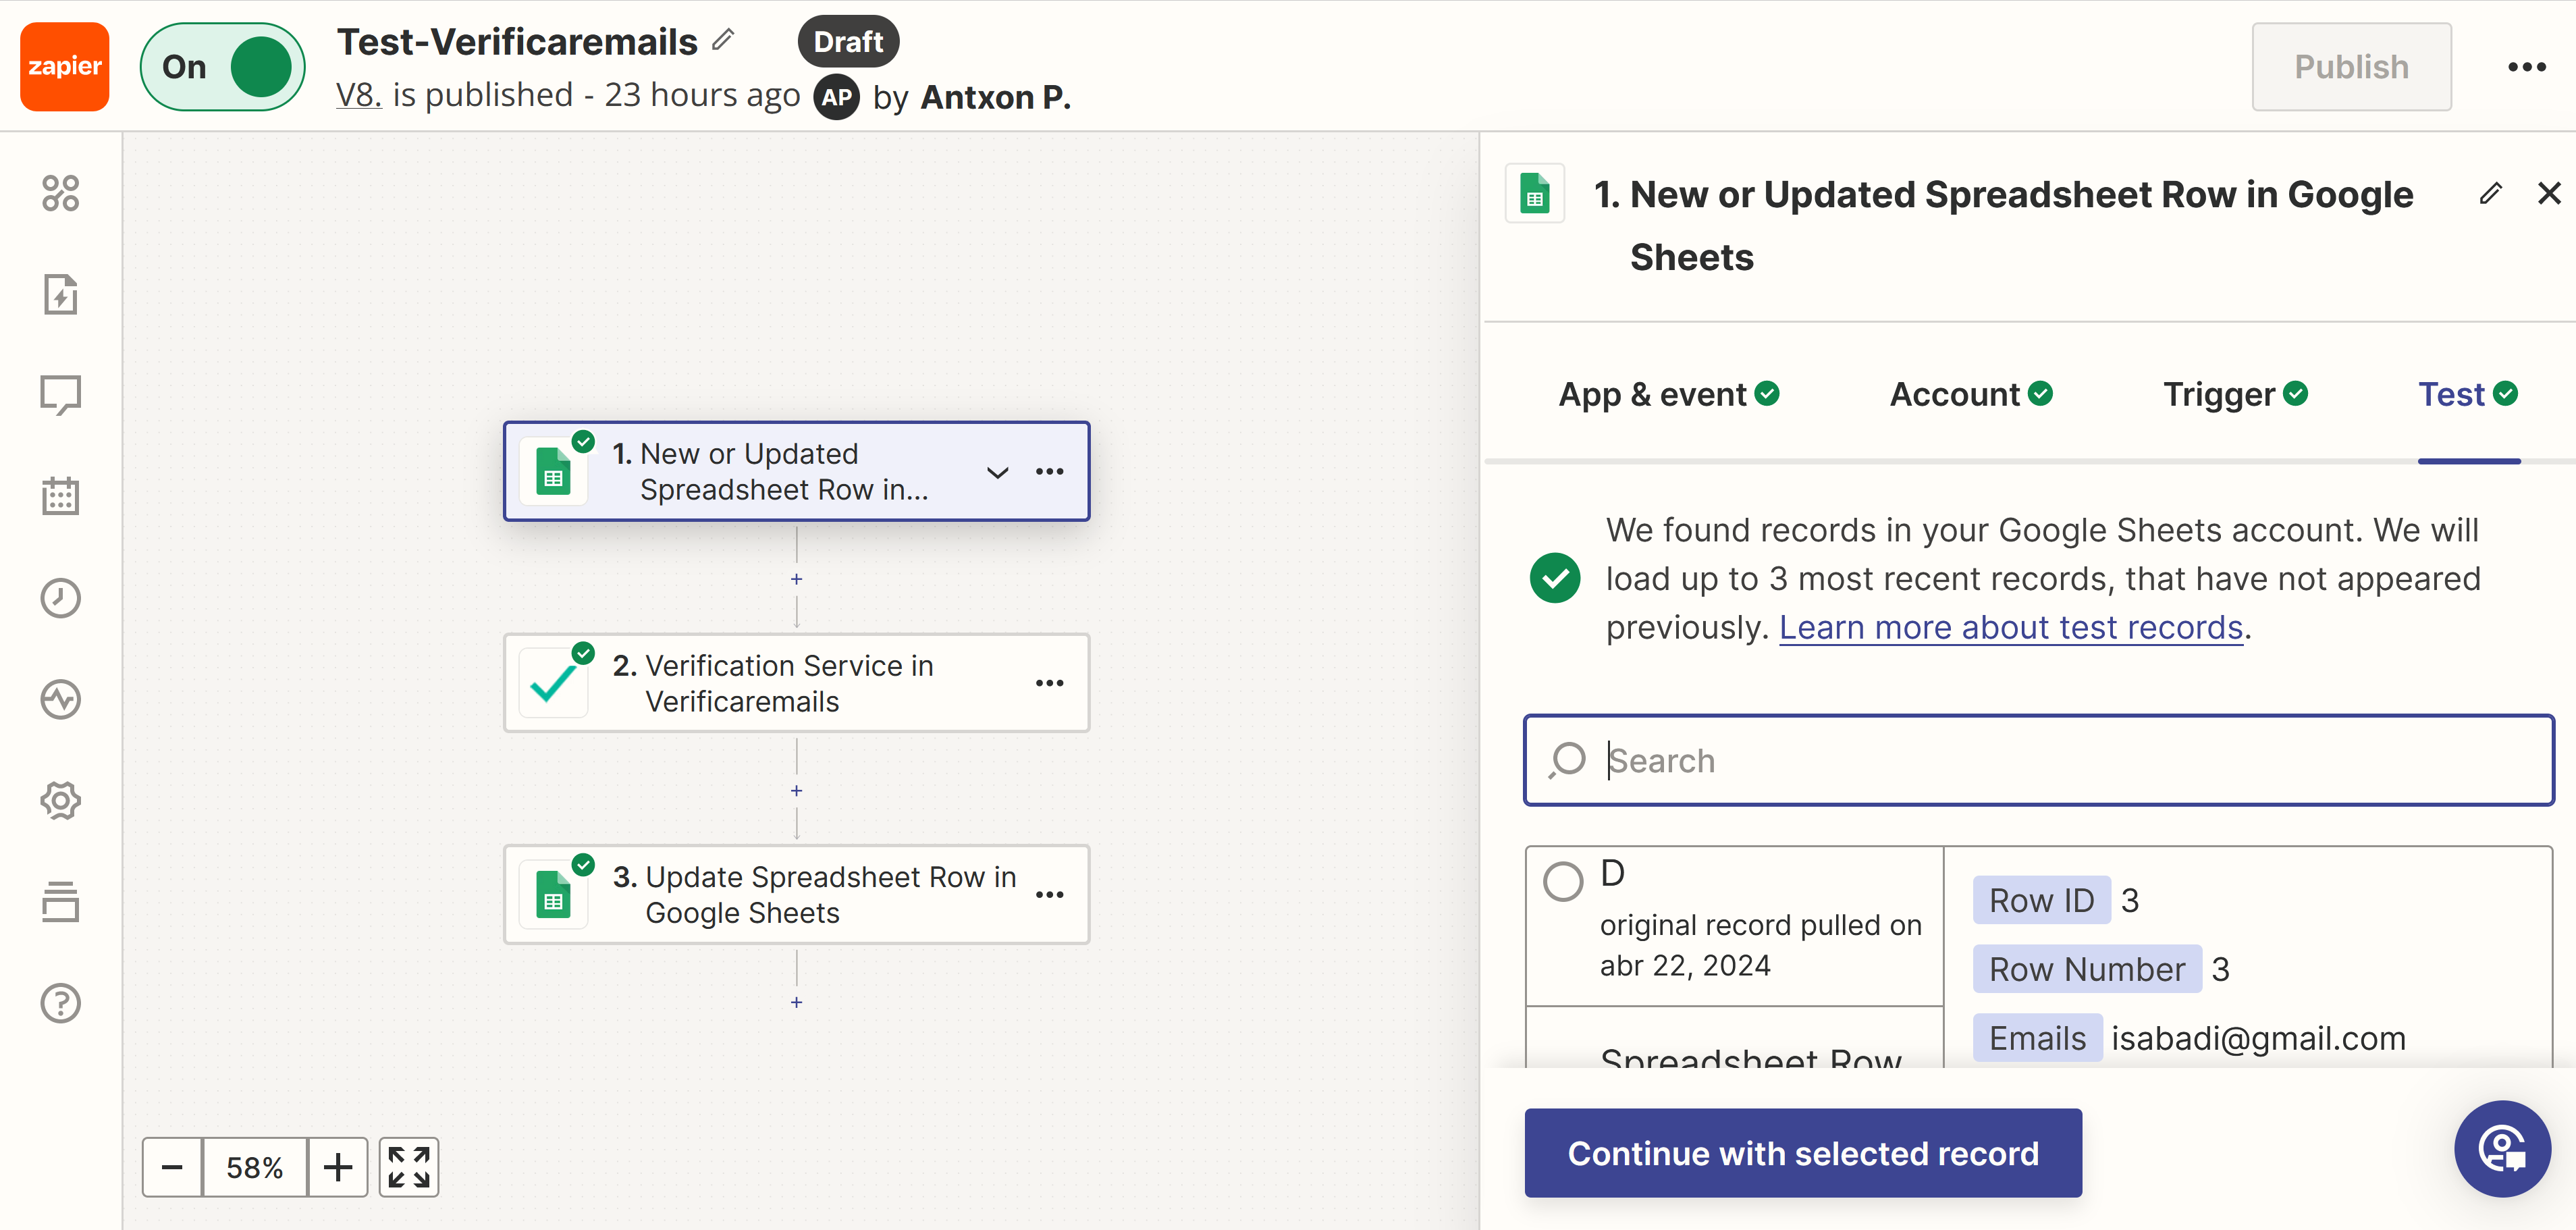
By choosing “Search new records”, Zapier connects to the selected Google spreadsheet and searches for the records in the “Emails” column that contain the email addresses we want to verify. You must select one as an example. Select “Continue with the selected record”. If everything is correct, the Action section will be displayed. In case of an error, an alert message will appear. In this case, review the settings of the previous steps, make the necessary corrections and test again. Once the settings are correct, click “Continue”.

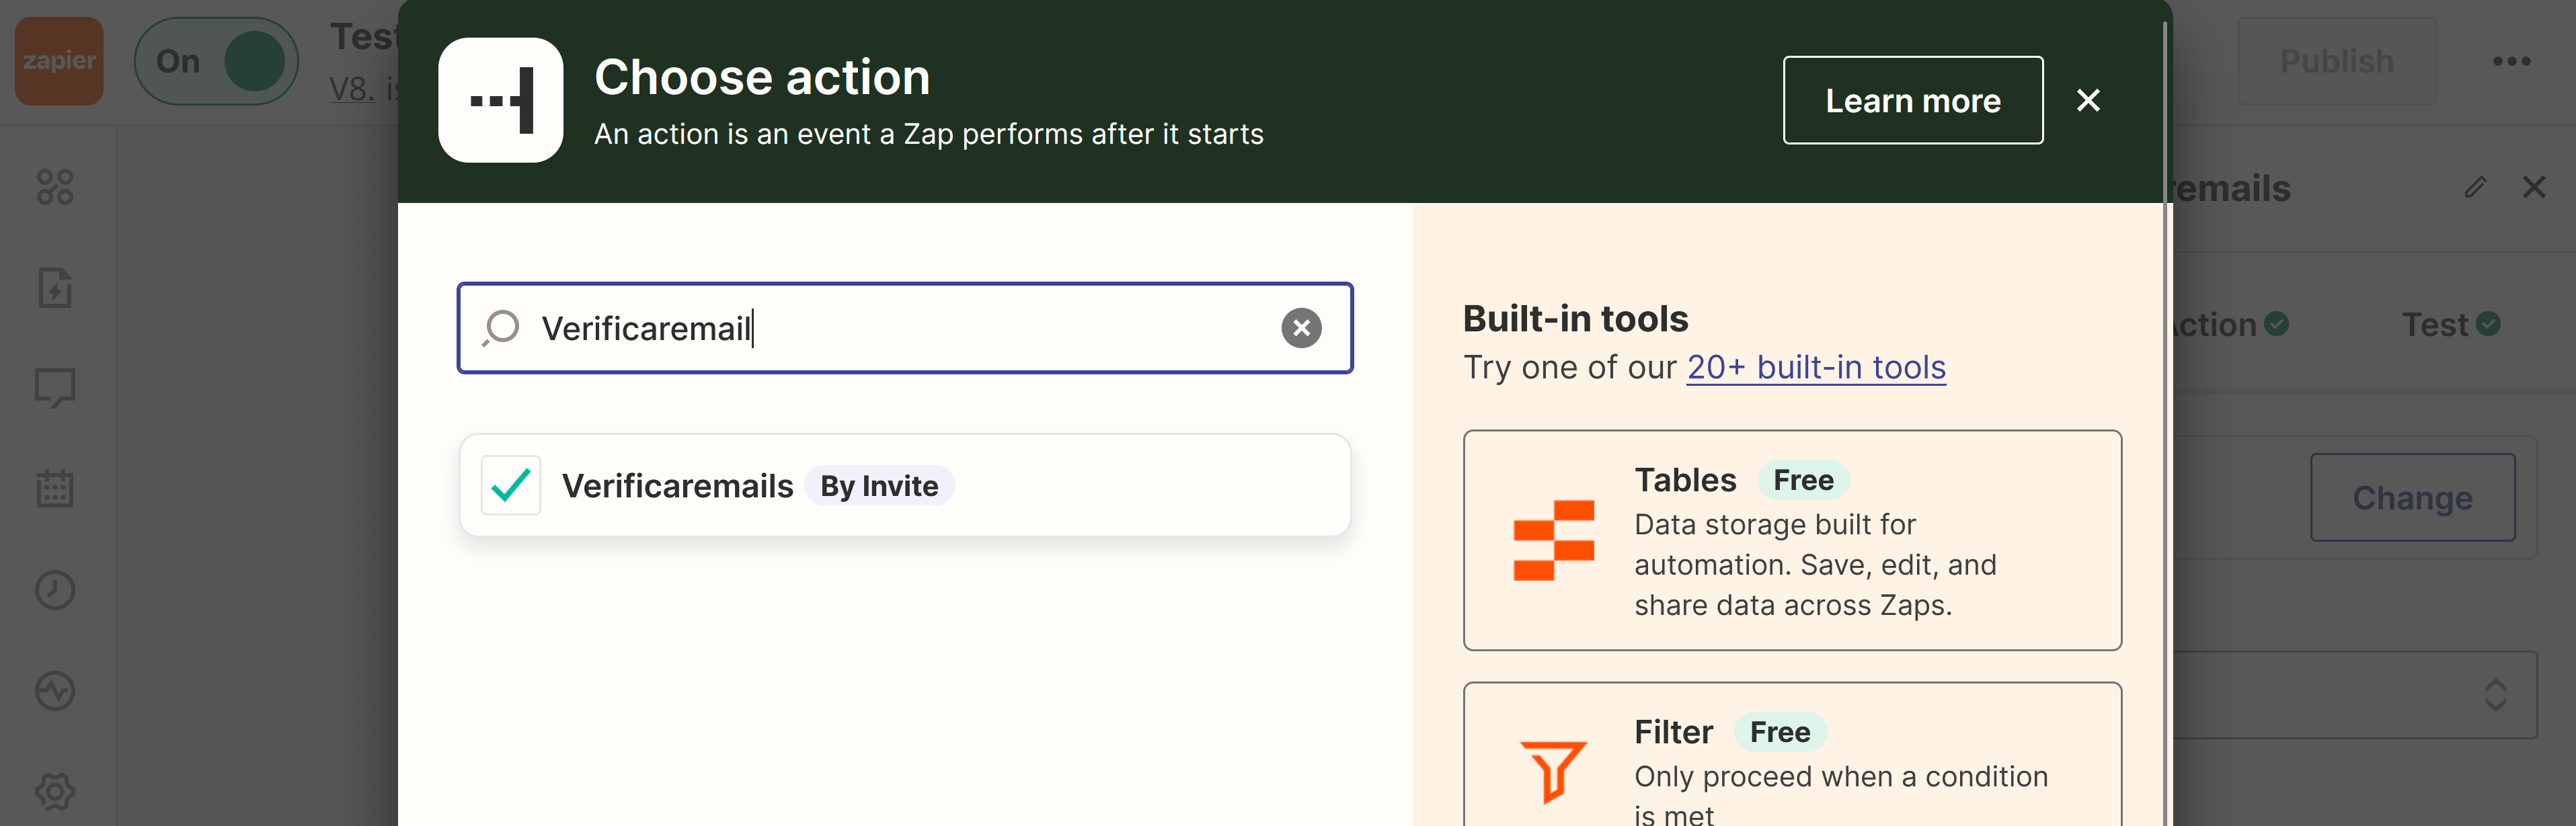
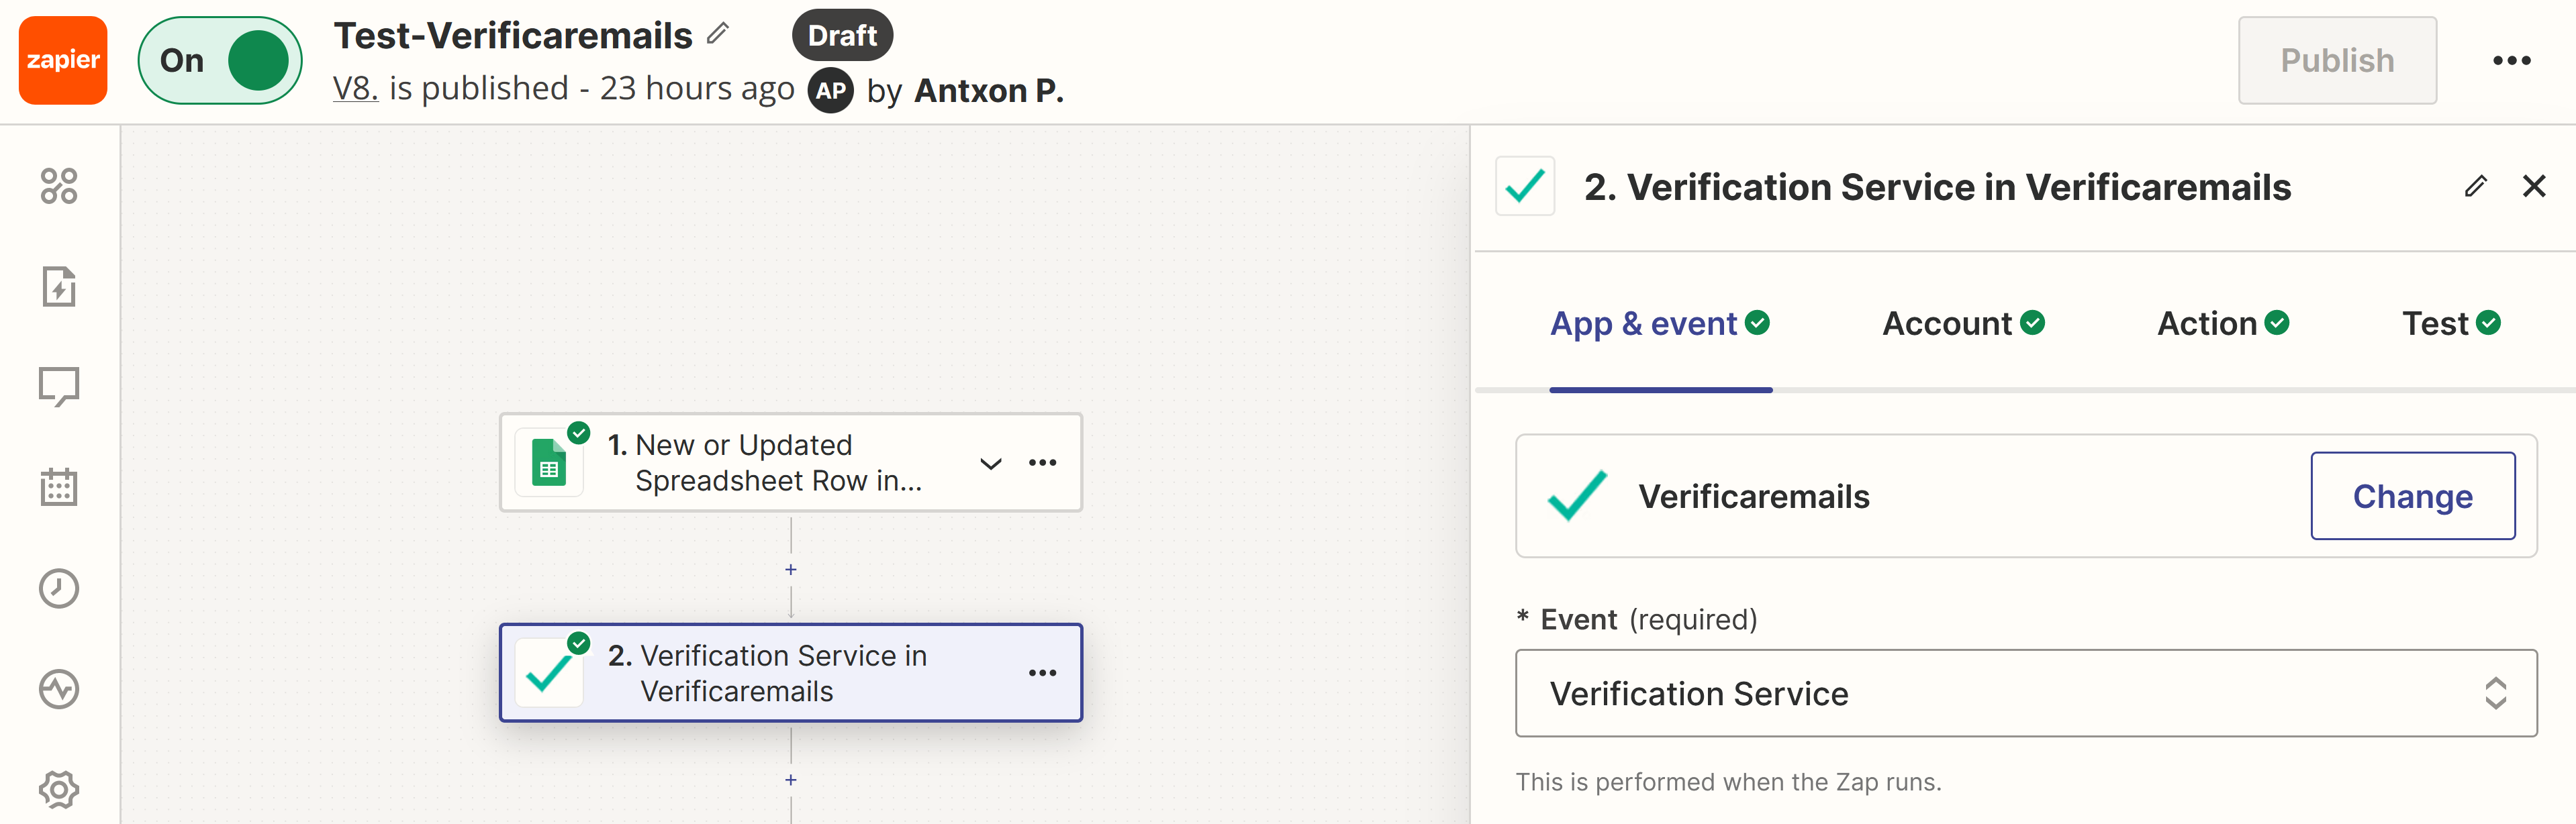
Step 7: Take action. We must define what action we want to perform on the data from the previous step, which contains the e-mail addresses to be verified.

Once the system knows which spreadsheet to use and where to look for changes or new emails, all you need to do is tell it what to do with the updated information. In the “Choose action” section, look for “Verifyemails” and select the application.

Zap Verificaremails

Once selected, what we must do is select the type of event we are going to use for the verification of our contacts

Zapier - Verification services

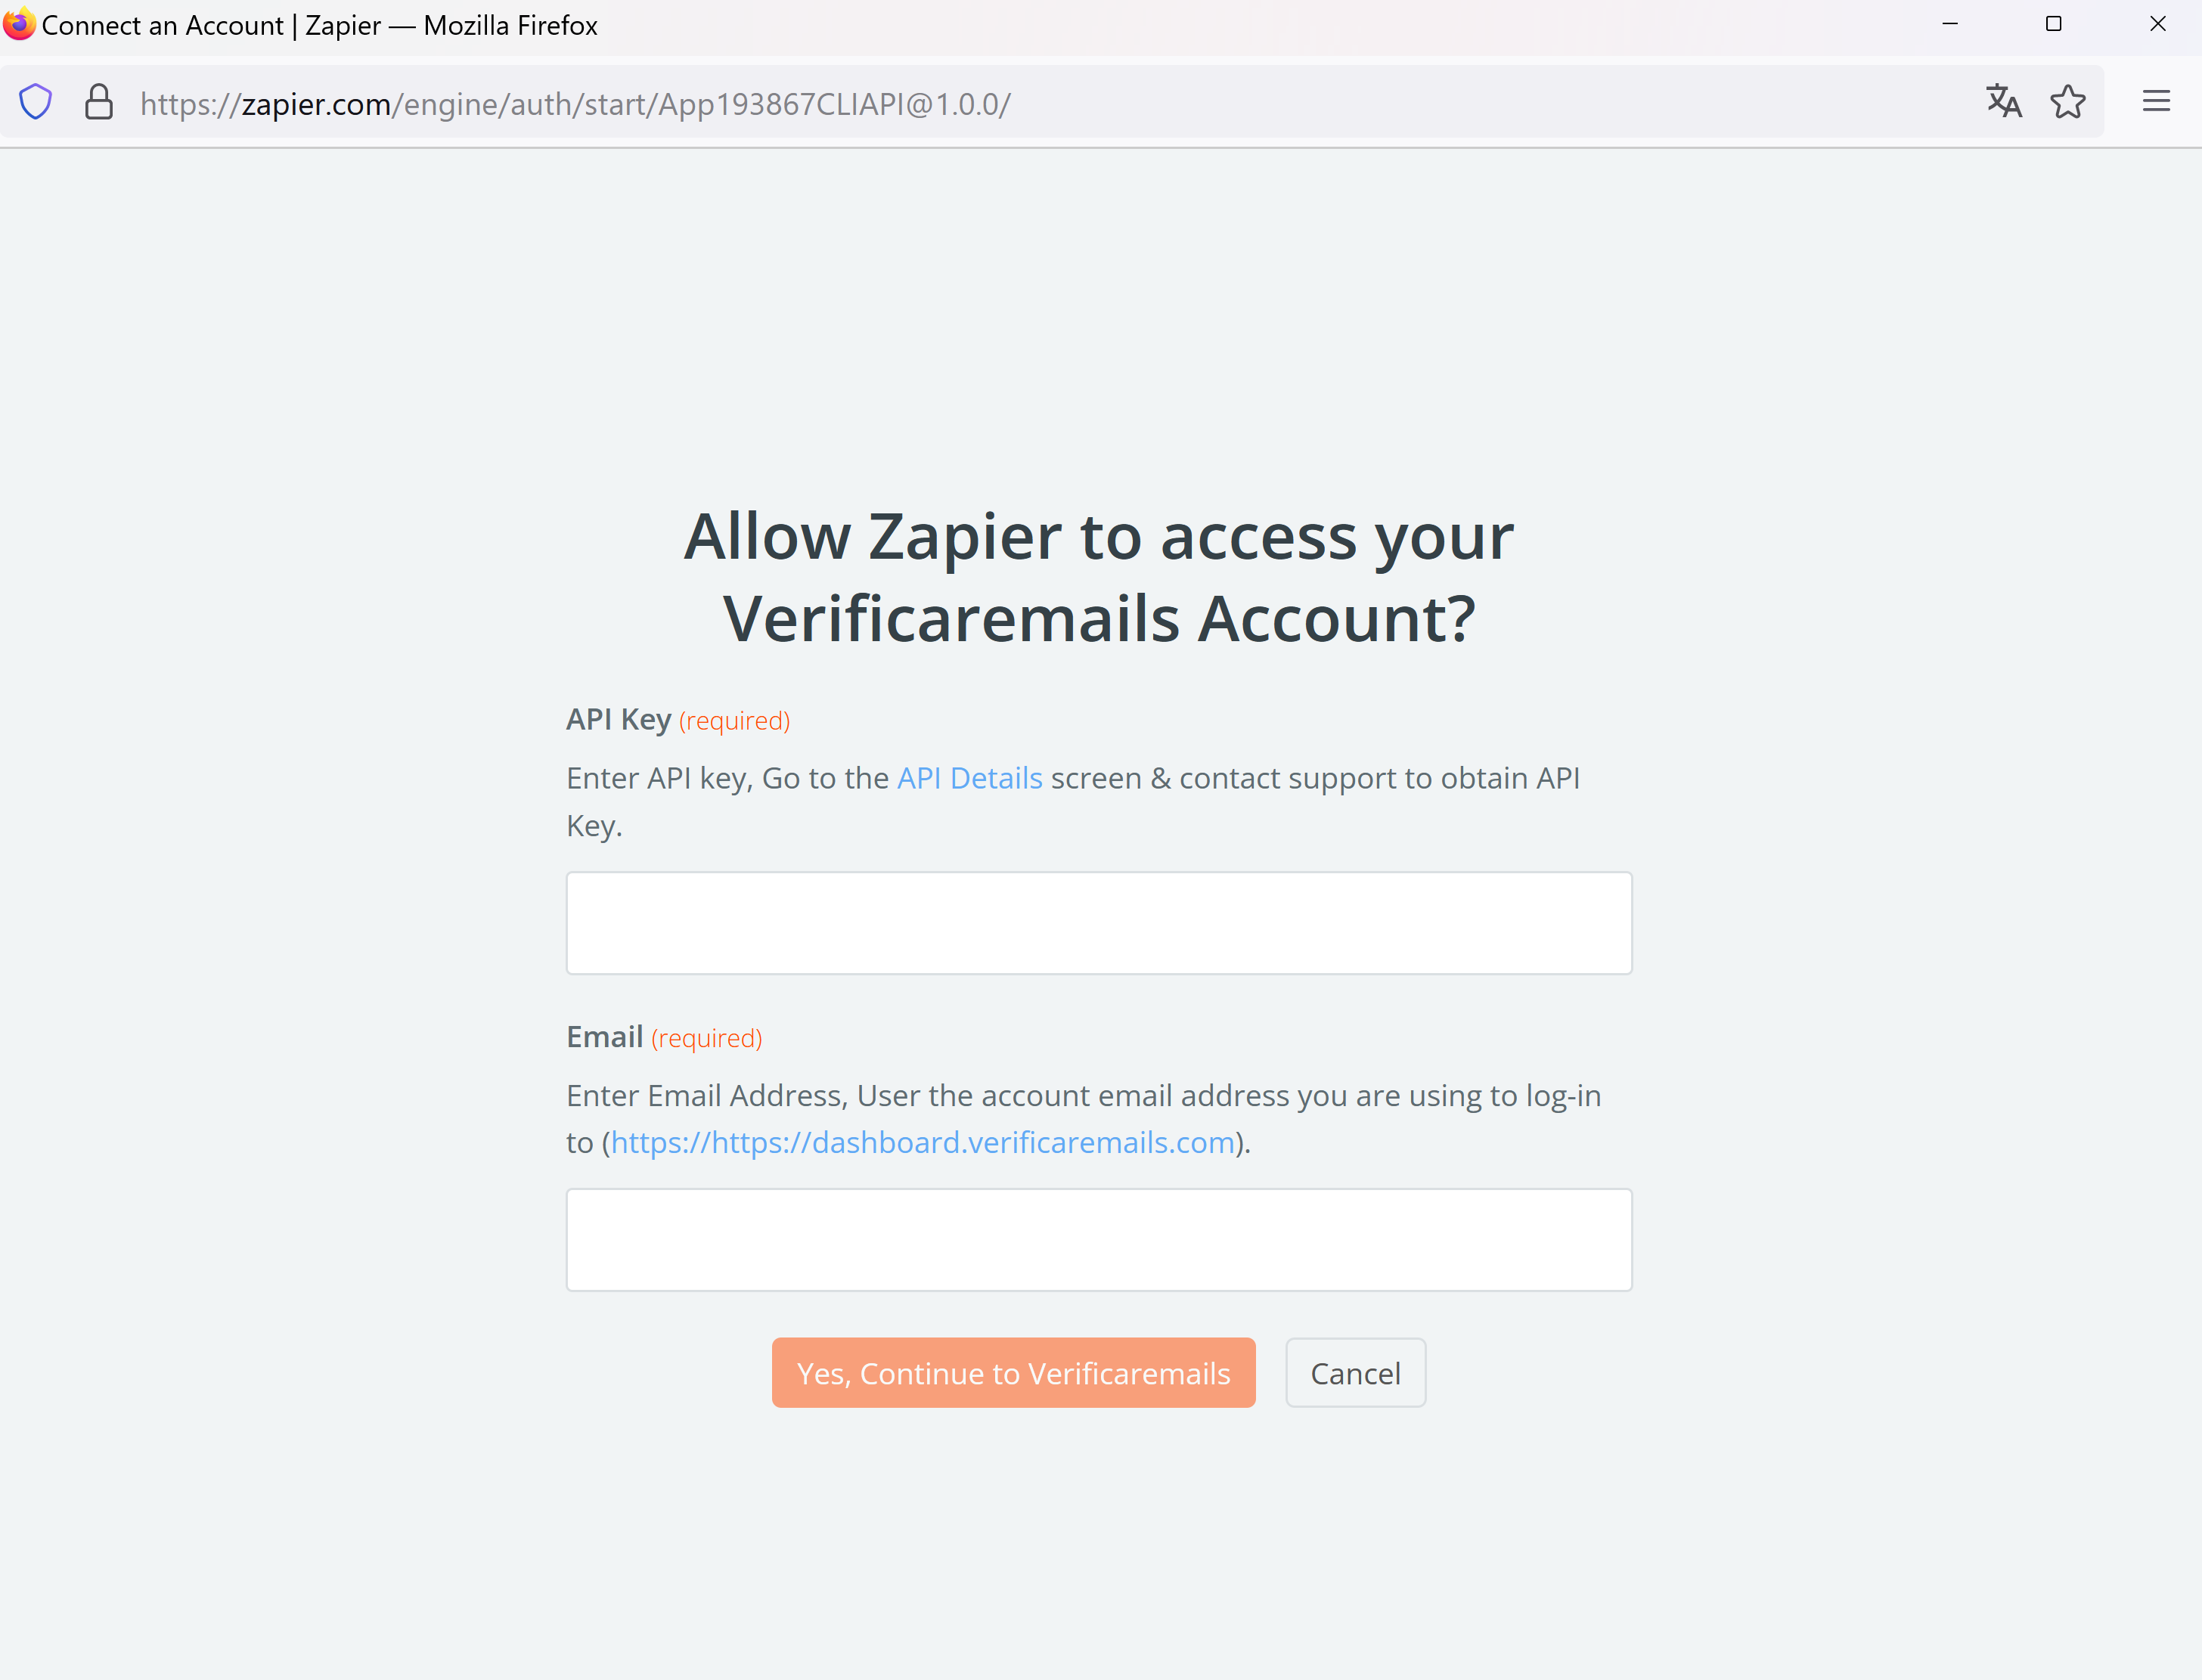
Step 8: The last step is to connect the Verificaremails account previously created.

Click on “Continue” and then on “+Connect a new account”. Then enter your API key (you can generate it in the API section of your account in Verificaremails). Finally, choose “Yes, continue to Verificaremails”.

Zapier Credentials Verificaremails

EThese credentials can be found in our Verificaremails.com account in the APIs section. Remember that each service has its own API. To be able to use all verification services in the same Zap you can edit the “Token” field for each API and use the same credentials between all services.

Verificaremails API Credentials

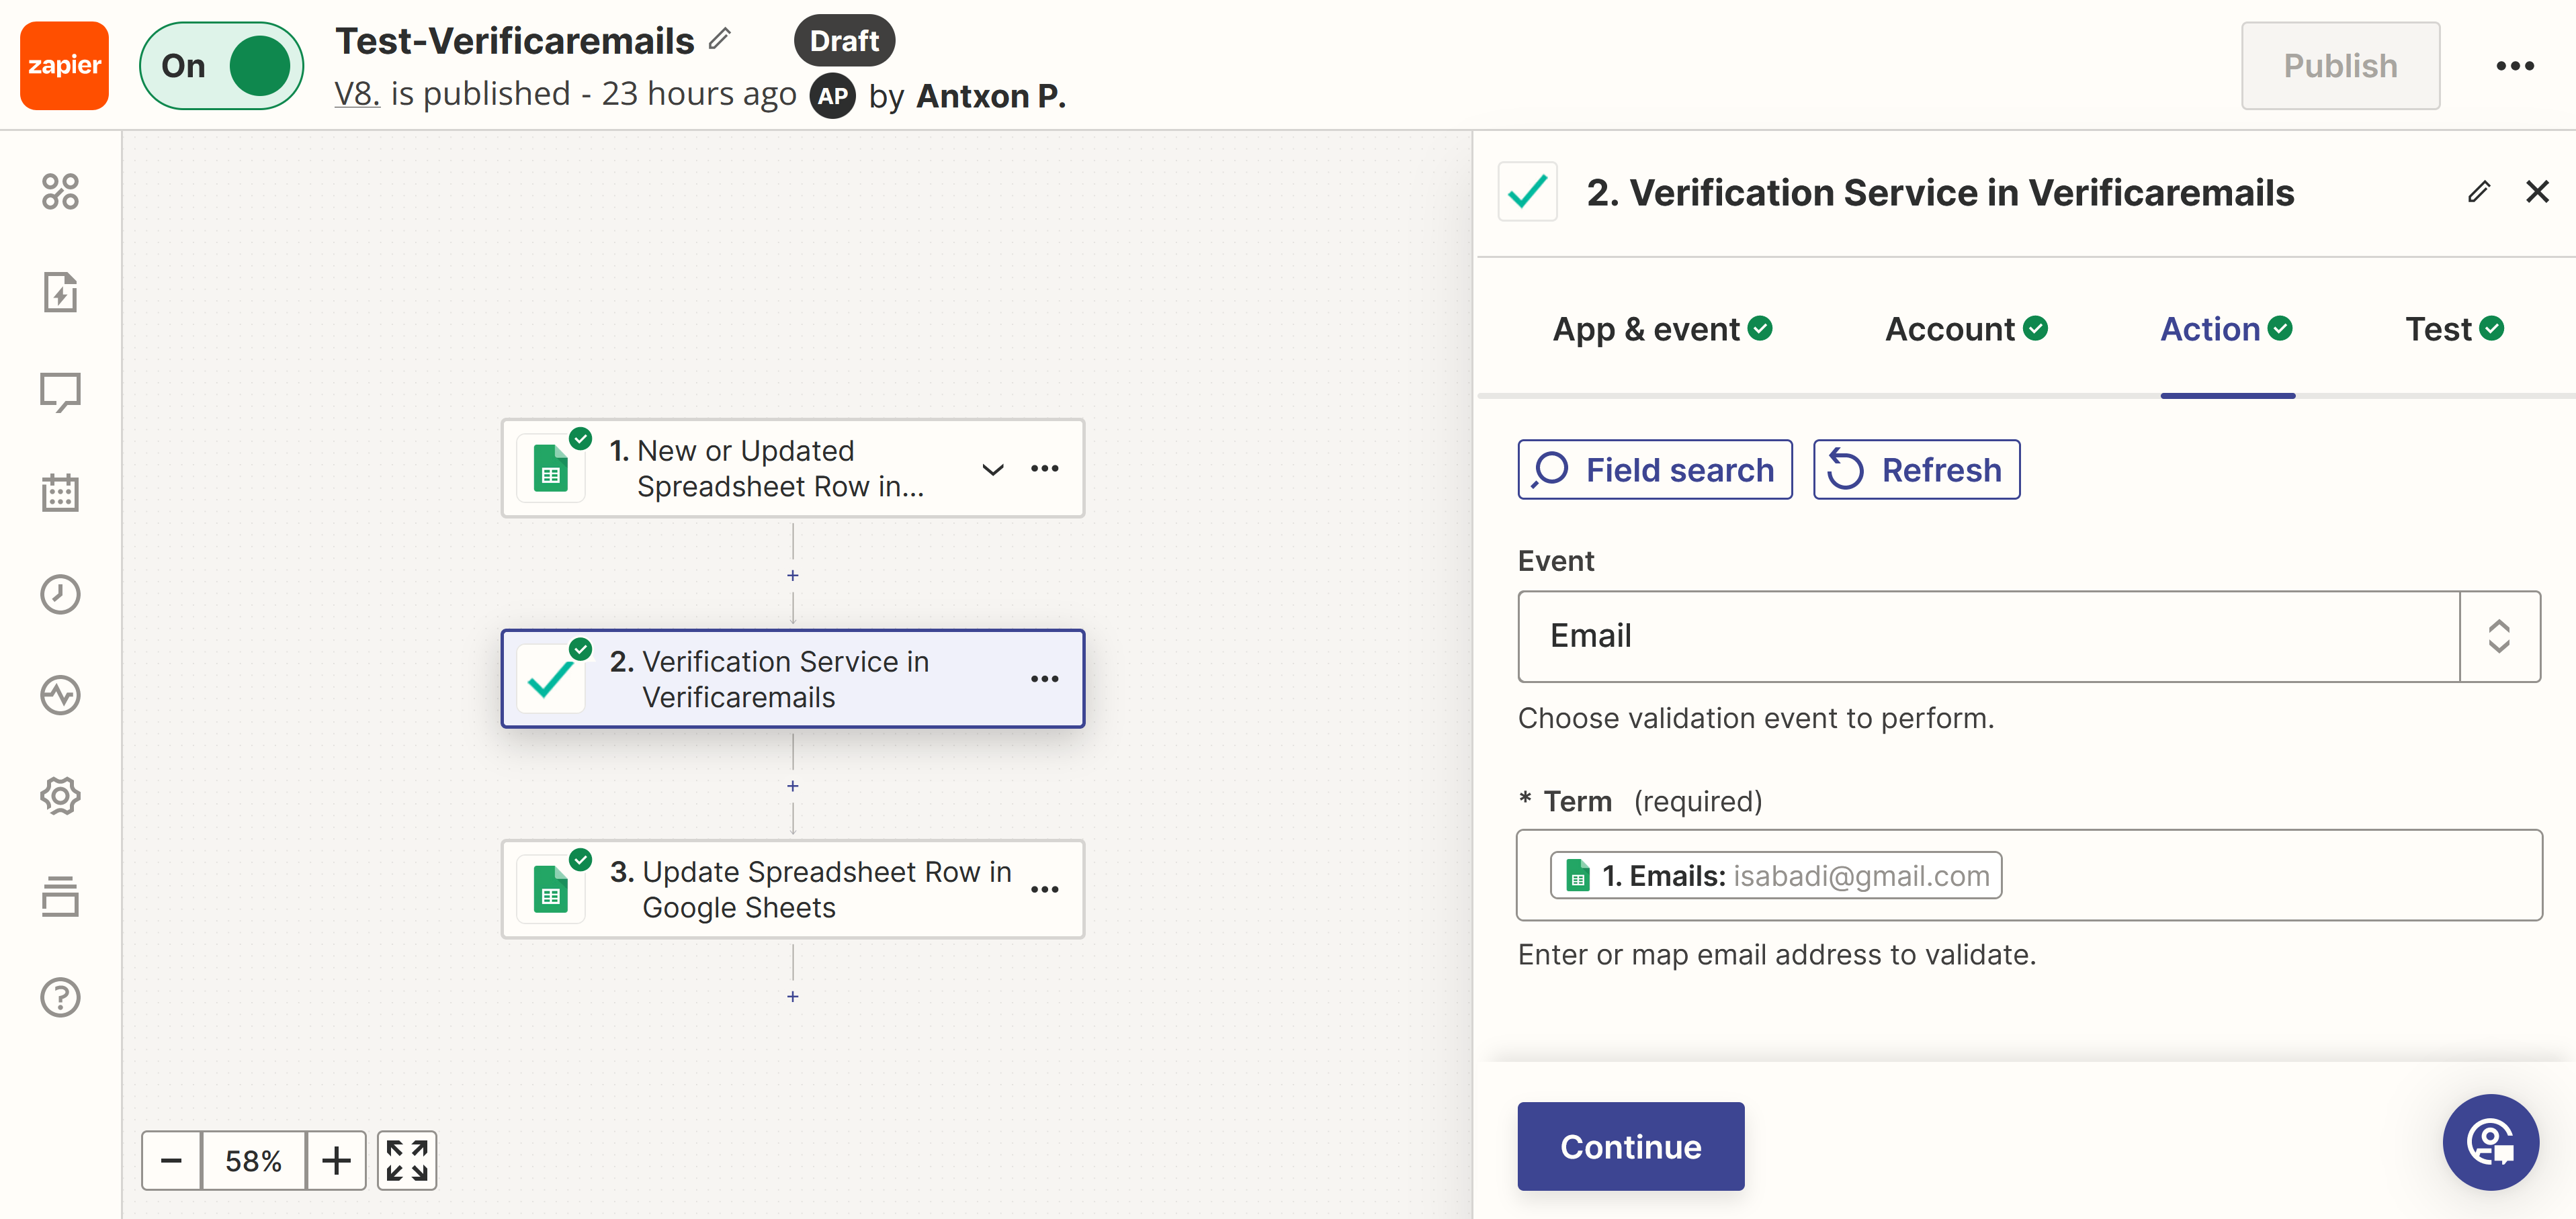
Step 9: Set the template. The creation of a standardized template for the project is the penultimate step in the process. This template will serve as the basis for the entire project and should include all the necessary information and parameters.

Google Sheet - Email Verification

To begin, select the column with the email addresses from your spreadsheet by clicking on “Emails”. Then click on“Continue”.

Zapier - Google Sheet column to be verified

Step 10: A check must be made to verify that the data source is connected to the verification service.

Test Verifyemails connection

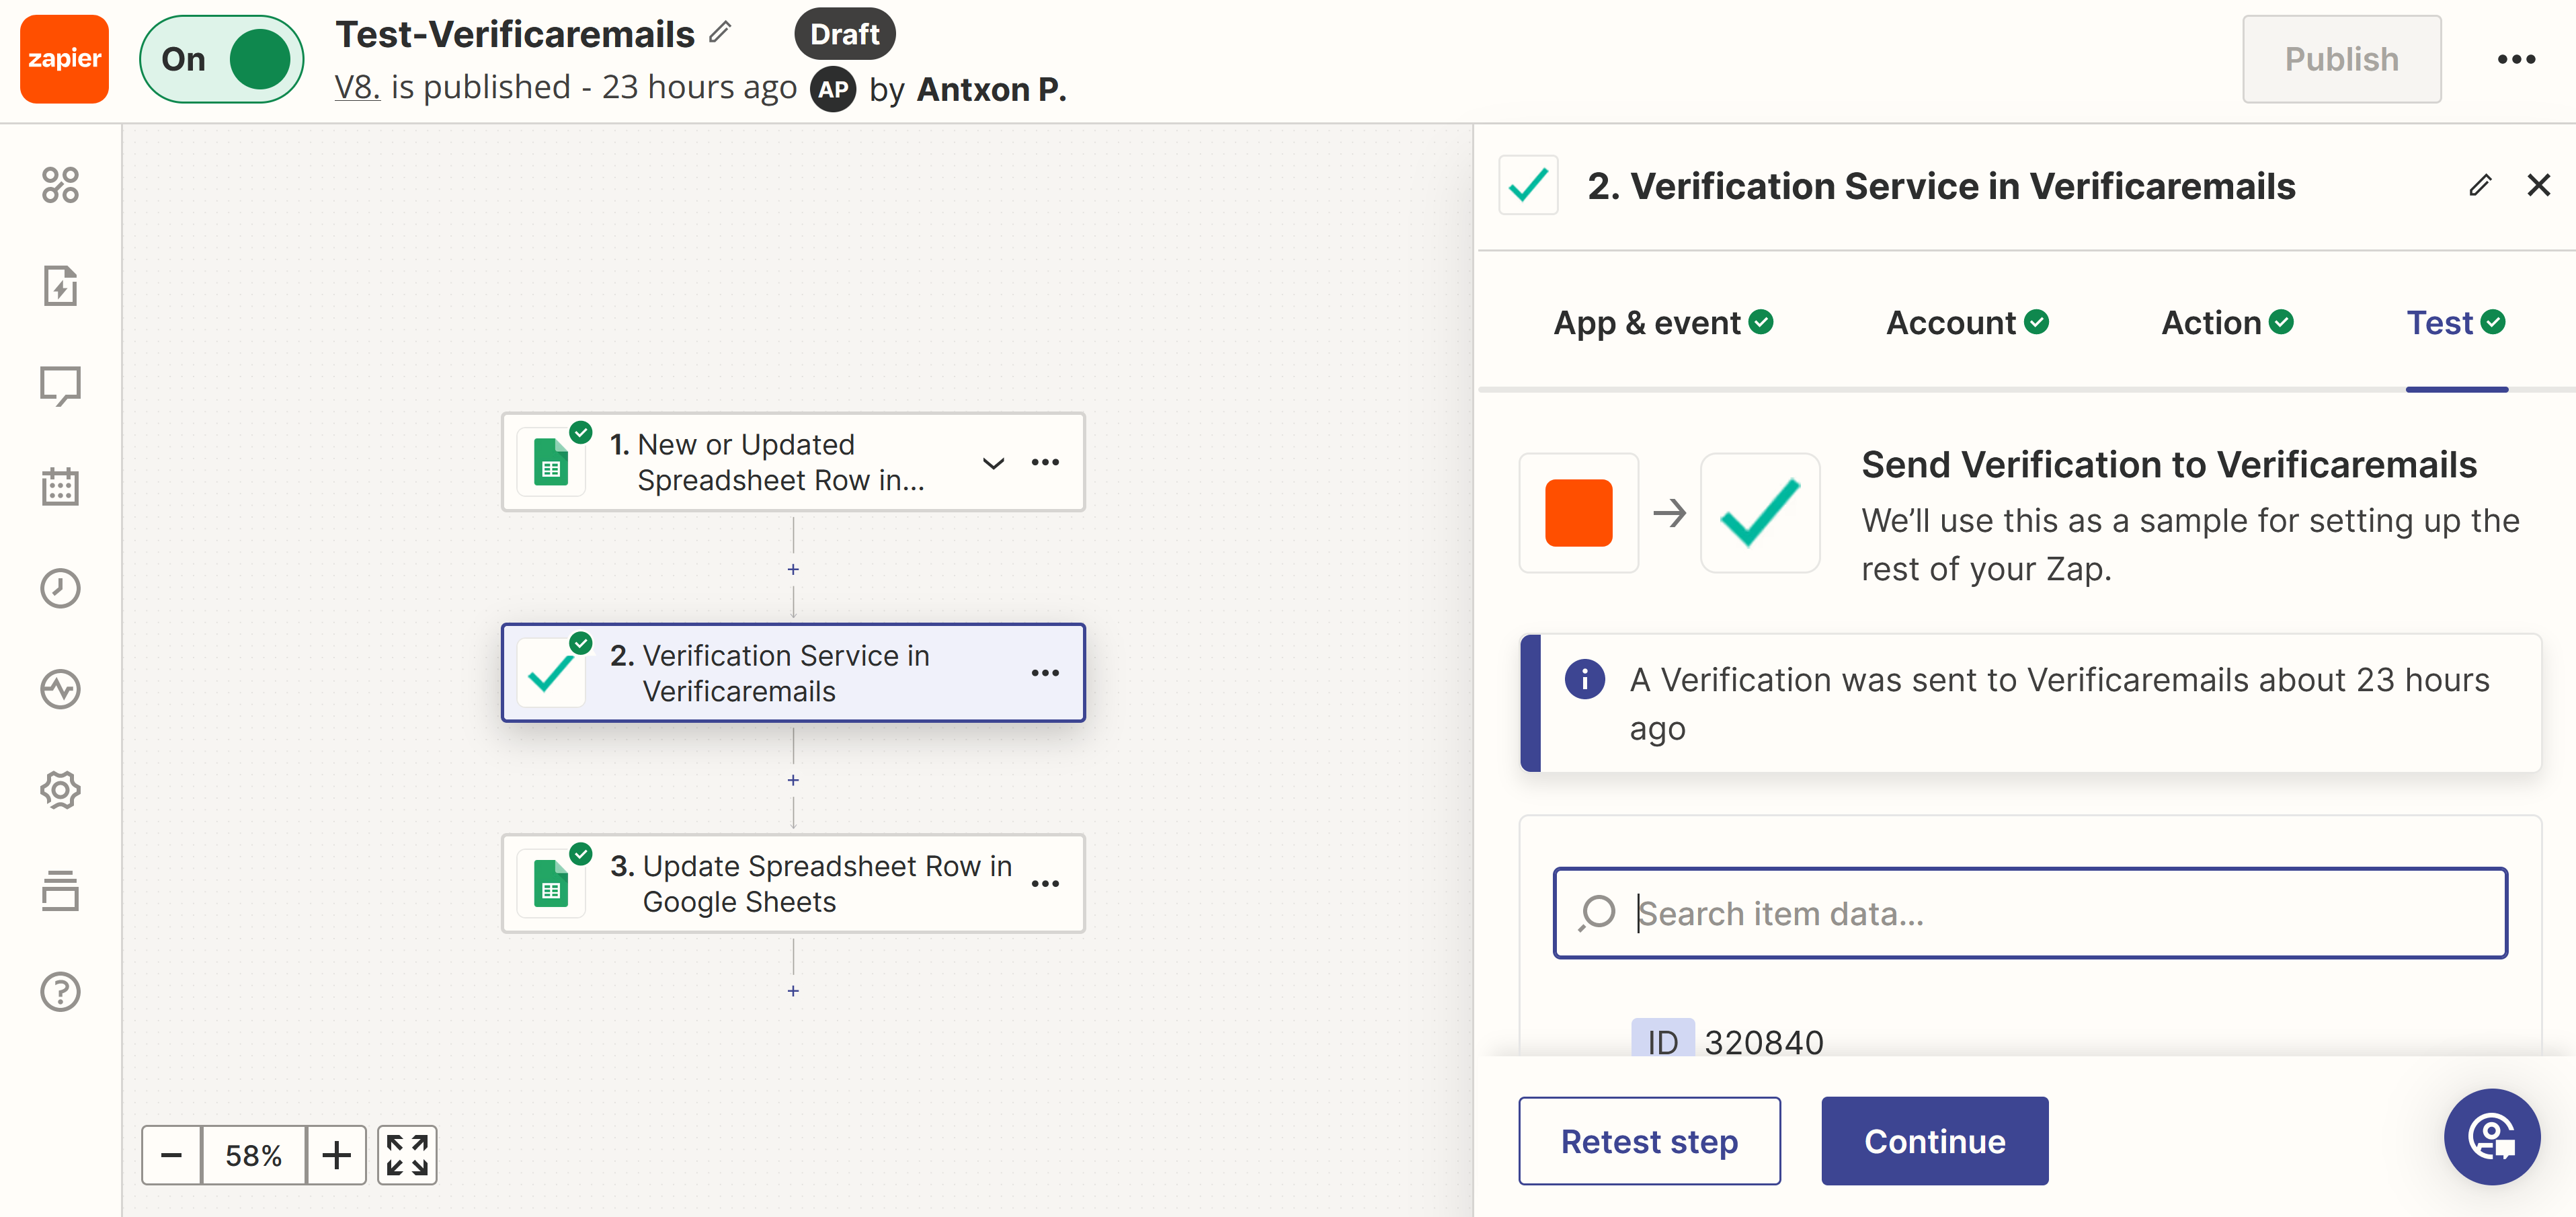
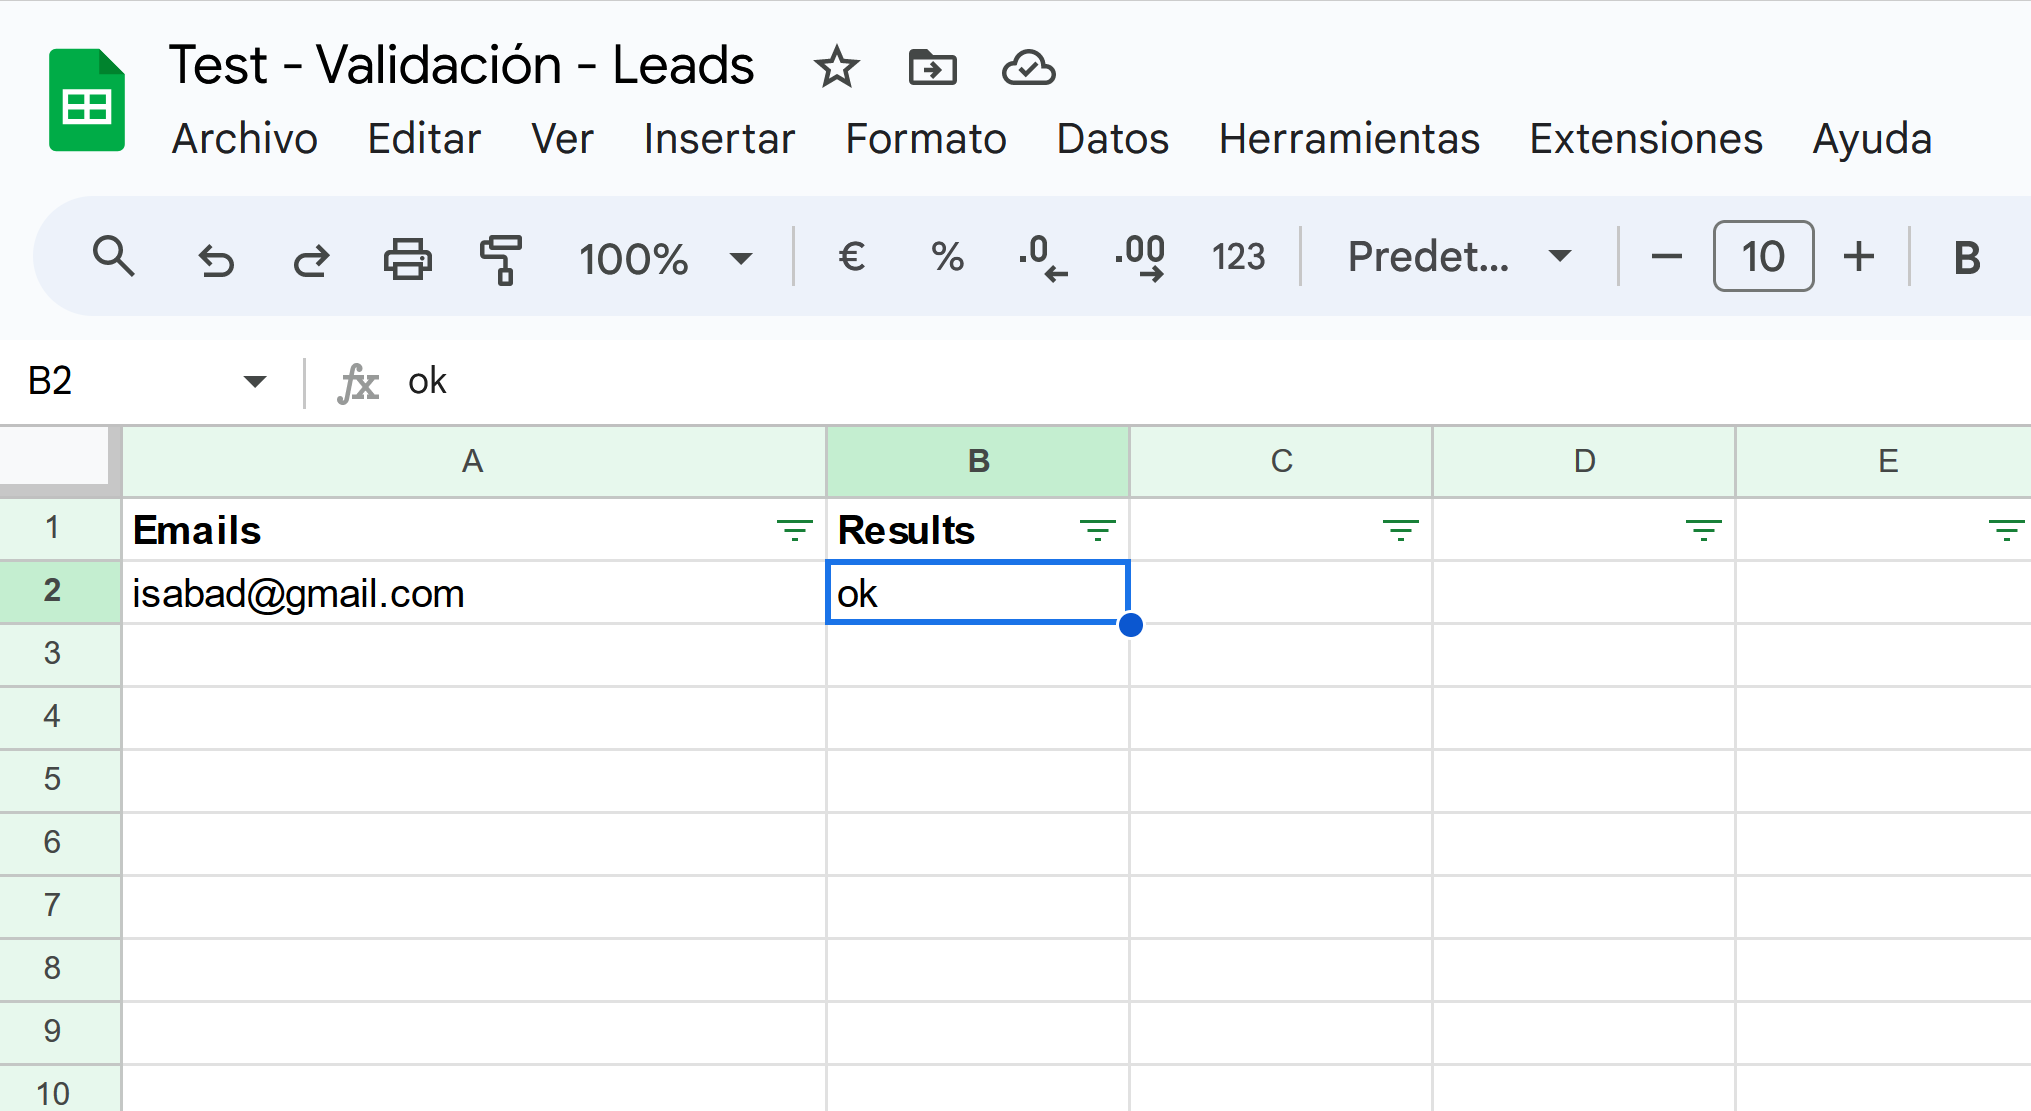
In the image below you can see the response from the verified email.

Verify email address verification response with Verificaremails

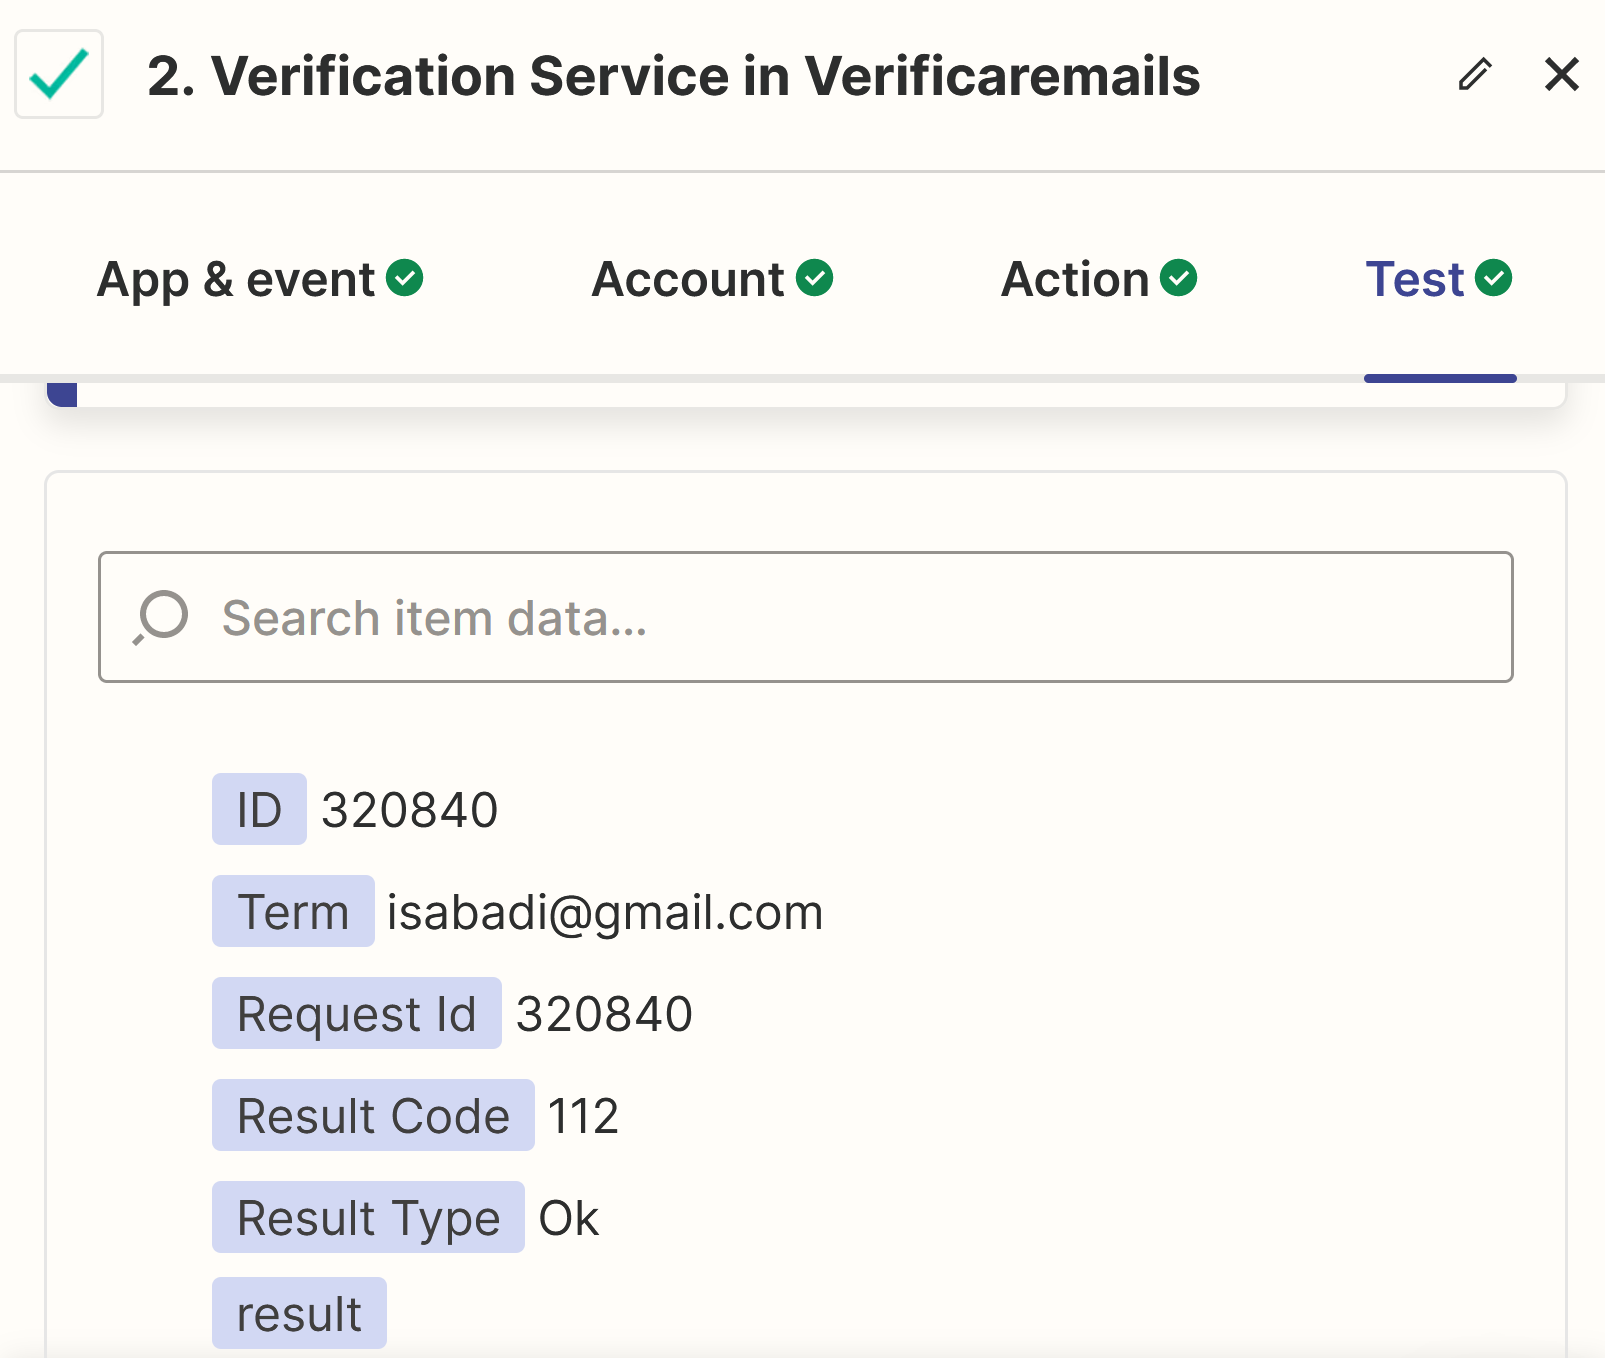
Before proceeding, the system will display a screen to verify the configuration. Please check the main field for the email address. Then click on “Retest step”. The system will perform a configuration check. If everything is correct, a message will appear indicating that the test was successful and the verification result will be displayed on the verified e-mail address. If the test was successful, click on “Publish”.

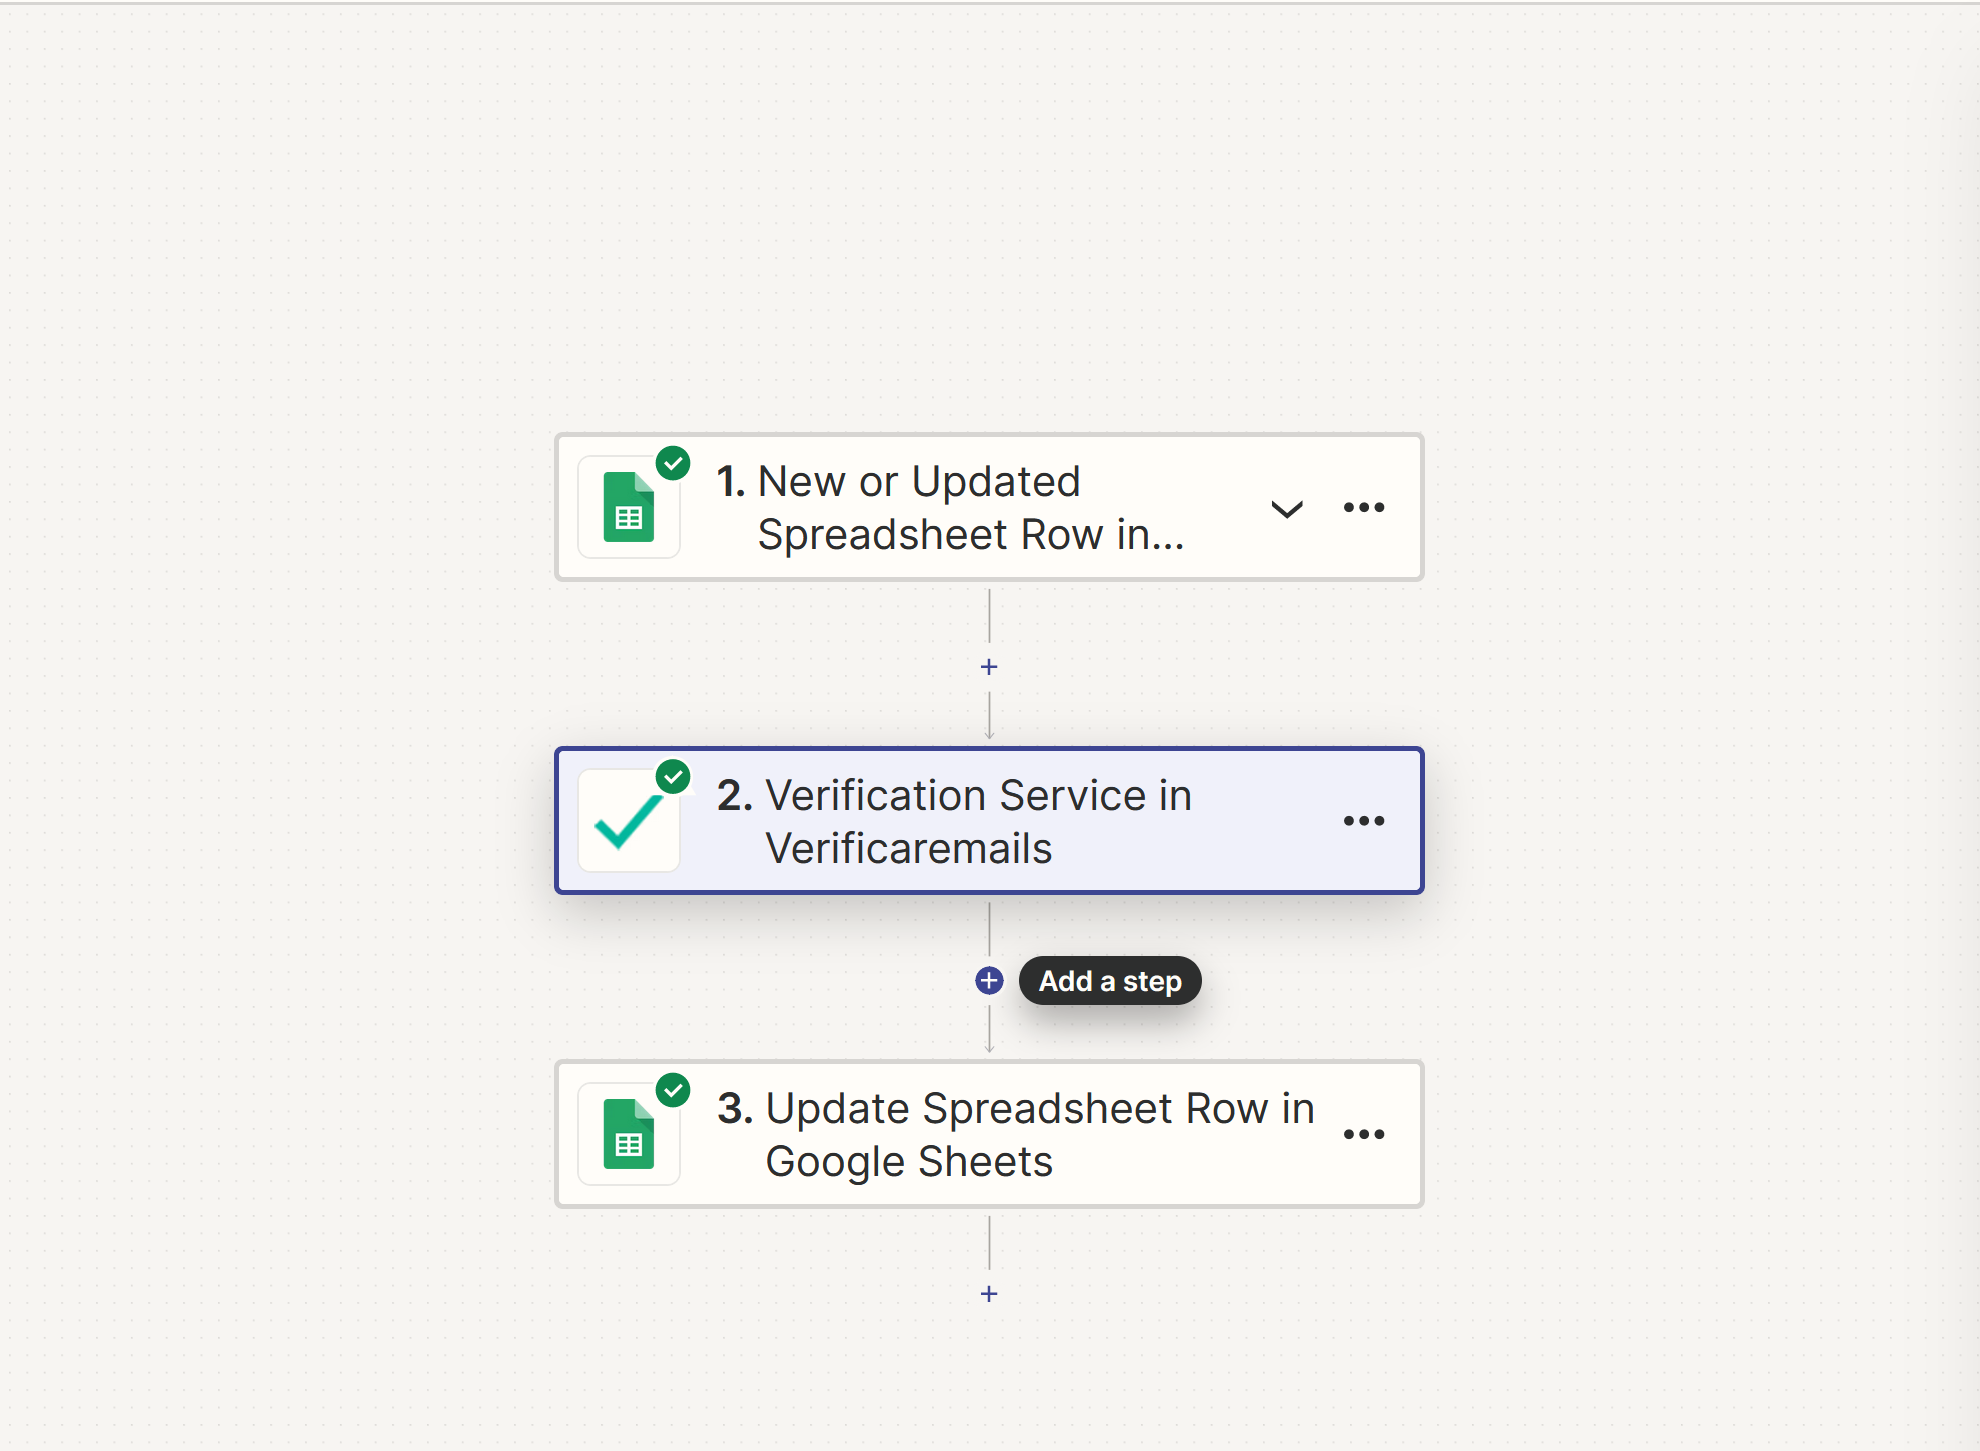
Step 11: Activate your Zap. When you reach the activation point of your Zap, an additional step is required to prepare it for use. Go to the bottom of the page and click on the “+” icon to add a new action that will return the verification results to the Google spreadsheet.

Step new zapier action

Step 12: A response to the results obtained must be defined.

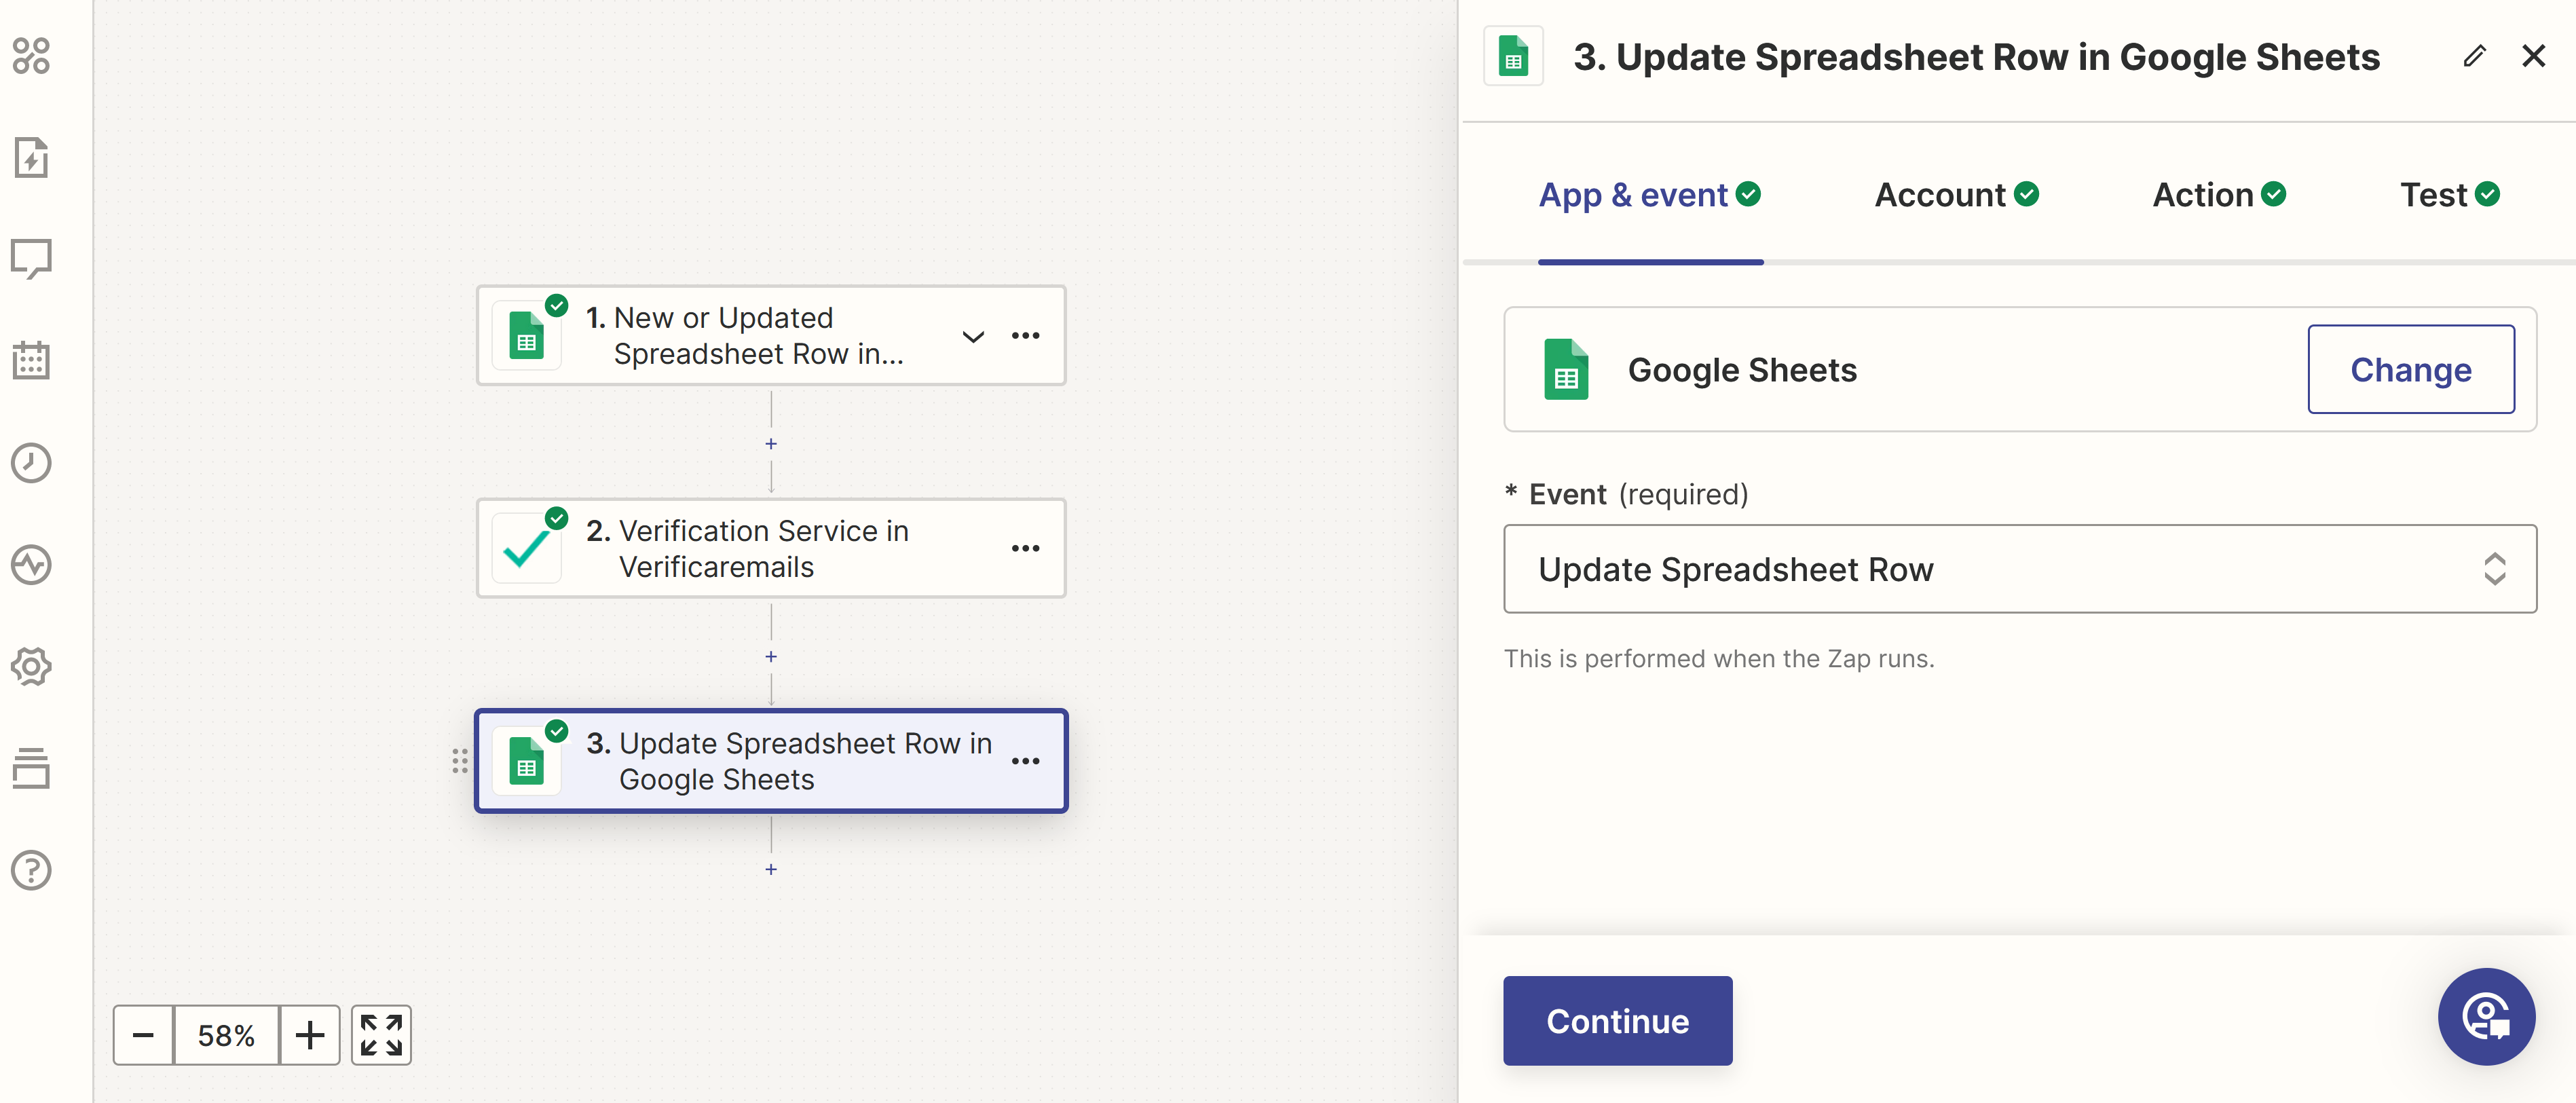
Again, you will need to select an application to perform the selected task. You will now see “Google Sheets” in the available applications. Click on “Google Sheets” and choose “Update Spreadsheet Row”. Then click on “Continue”.

Zapier action update results

Step13: A new configuration must be created for the Google Sheets account.

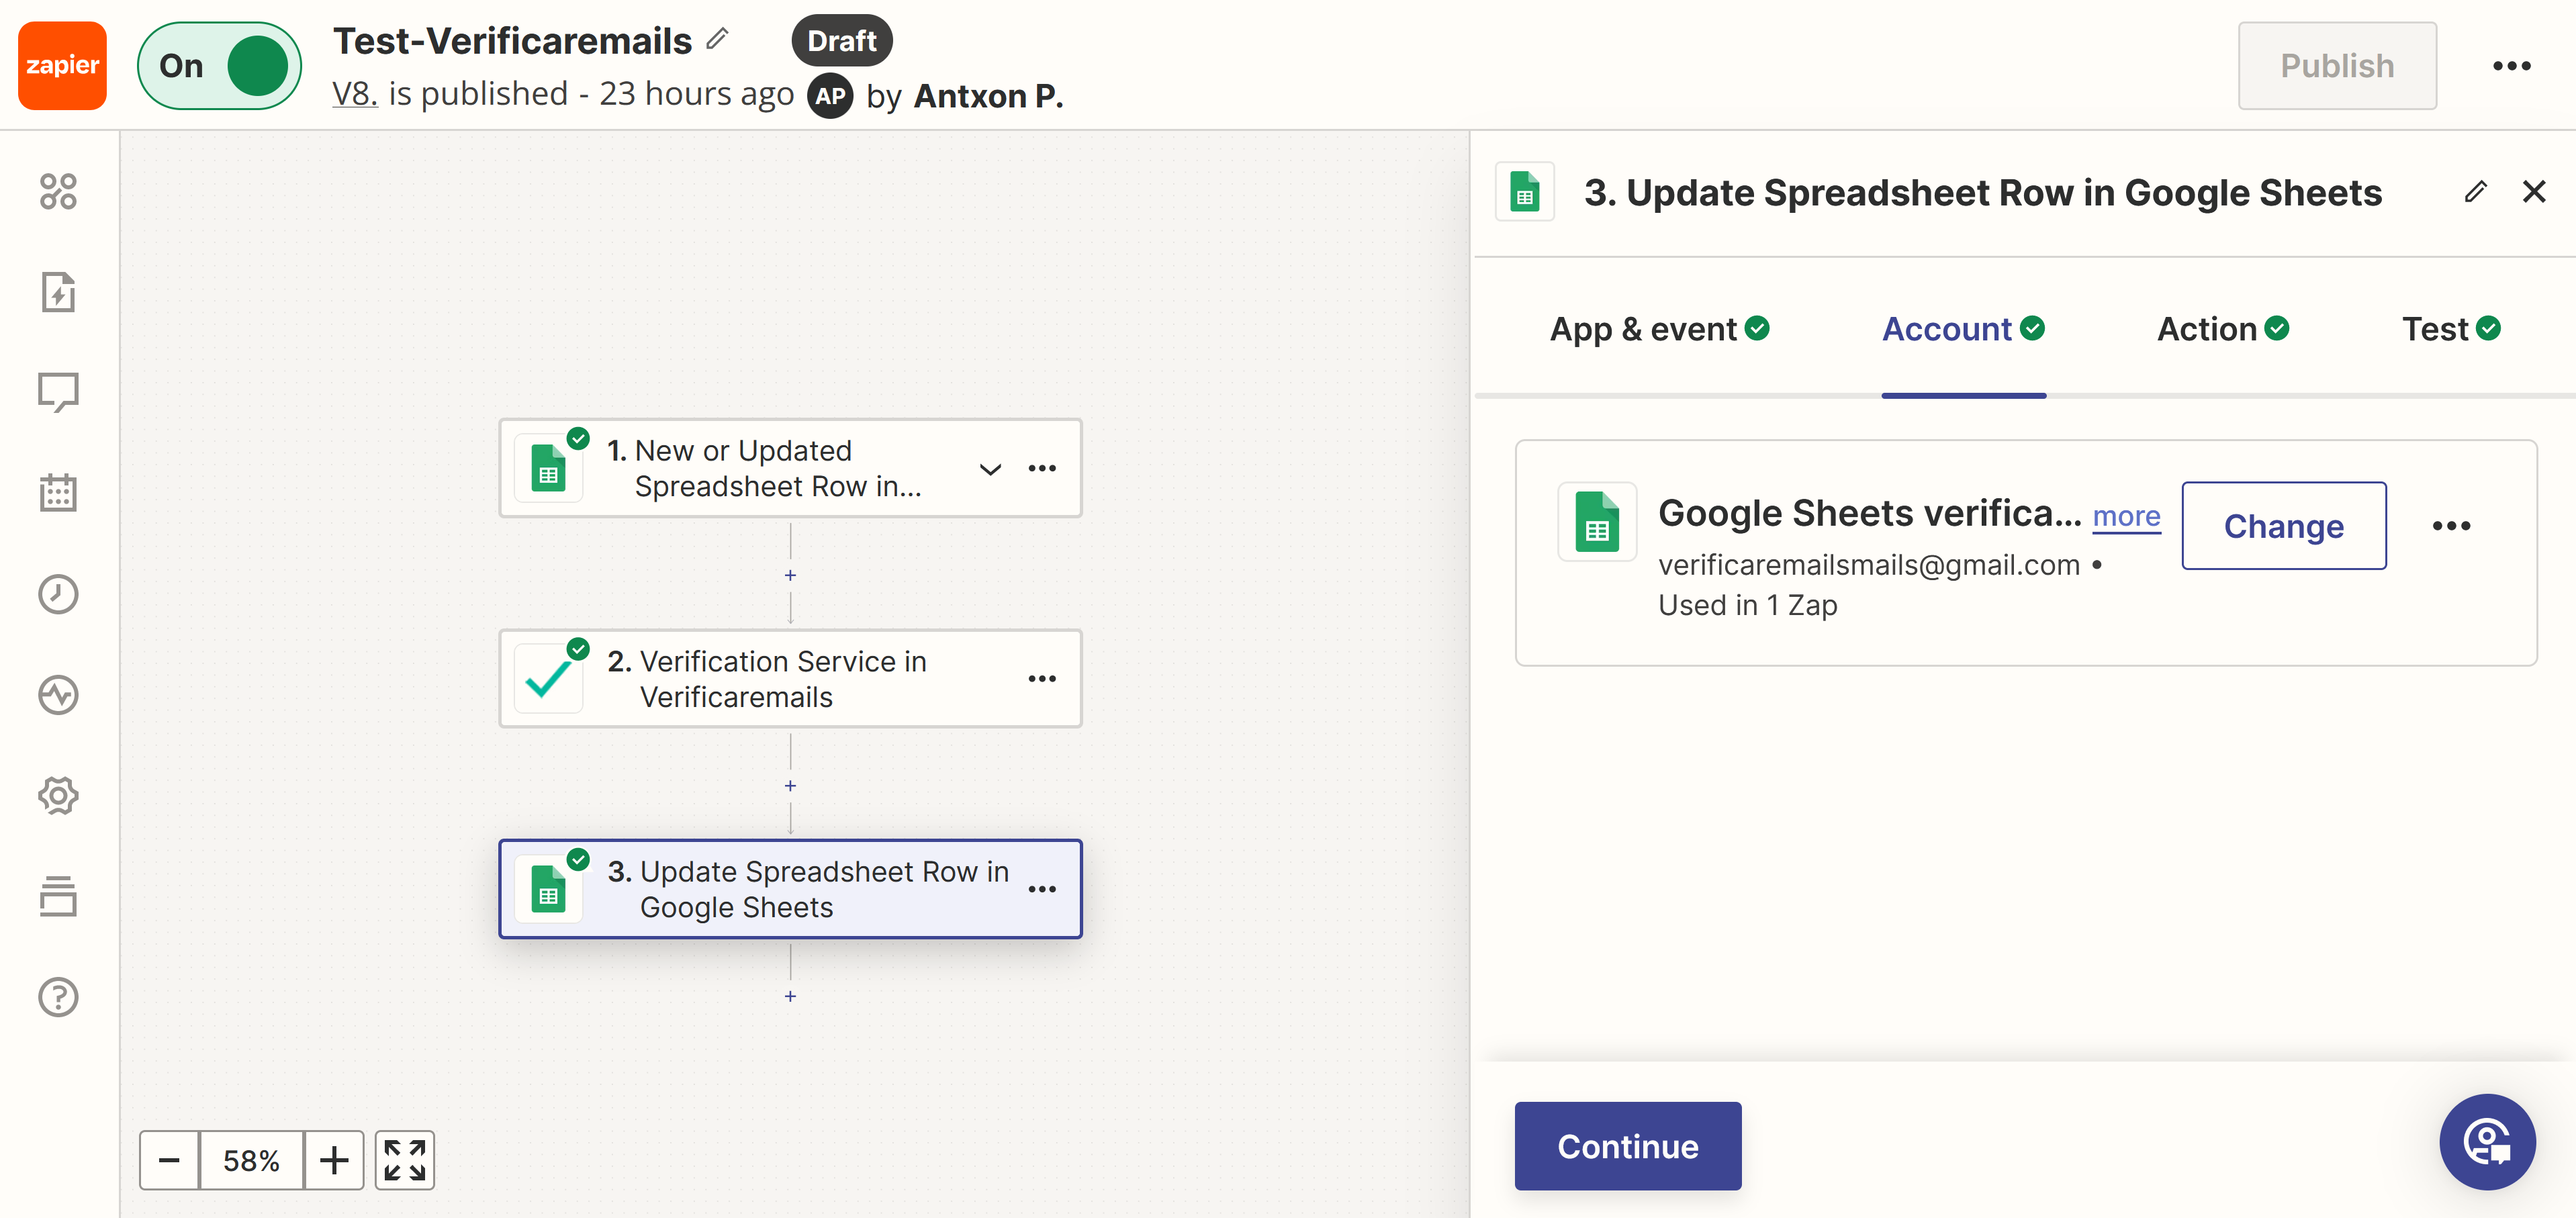
You will see that your Google account has already been selected. You do not need to log in again. Just click on “Continue” as we will save the data of the verified emails in the same calculation sheet from which we have obtained the emails.

Step 14: Choose the spreadsheet and columns to display the results.

Link Zapier results

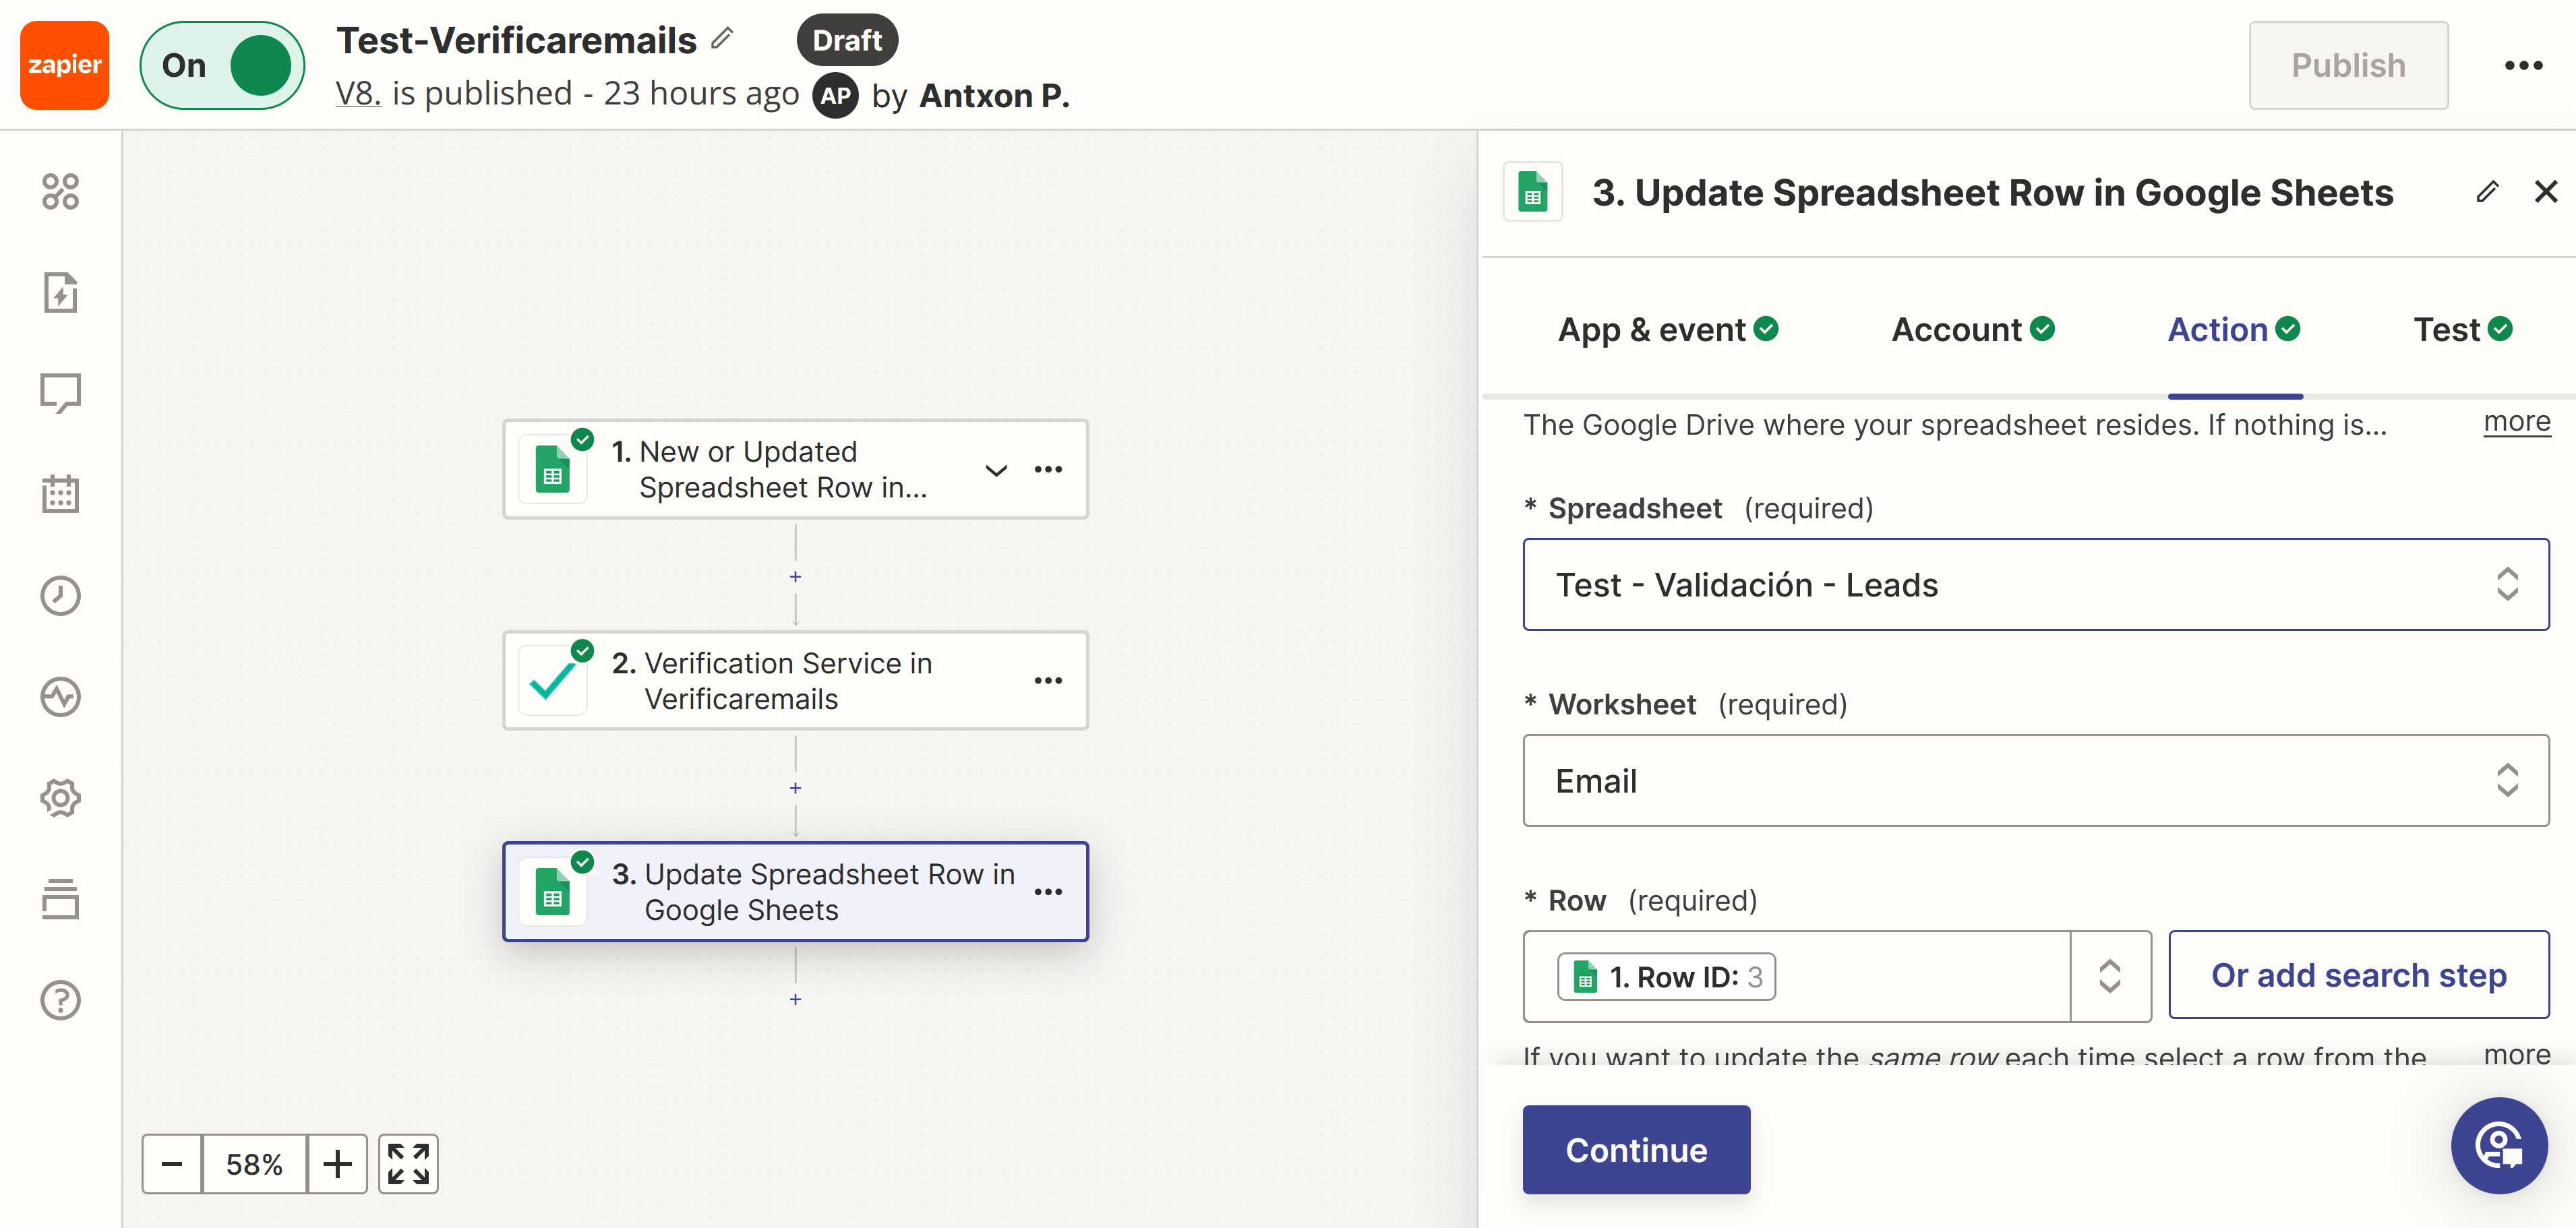
In step 6, we select the spreadsheet and the worksheet. Then, in the row, select the “Custom” option and look for the drop-down icon under “New or updated spreadsheet row in Google Sheets” and choose “Row ID” from the list. Next, scroll down to look at the fields created in the spreadsheets for the verification results (remember the “Validation Result” column discussed in the “What do we need?” section). Click on each field to select it (e.g. “Desired validation result”). Finally, click on “Continue”.

Step 15: Finish the configuration by performing a test.

Terminate Zapier connection

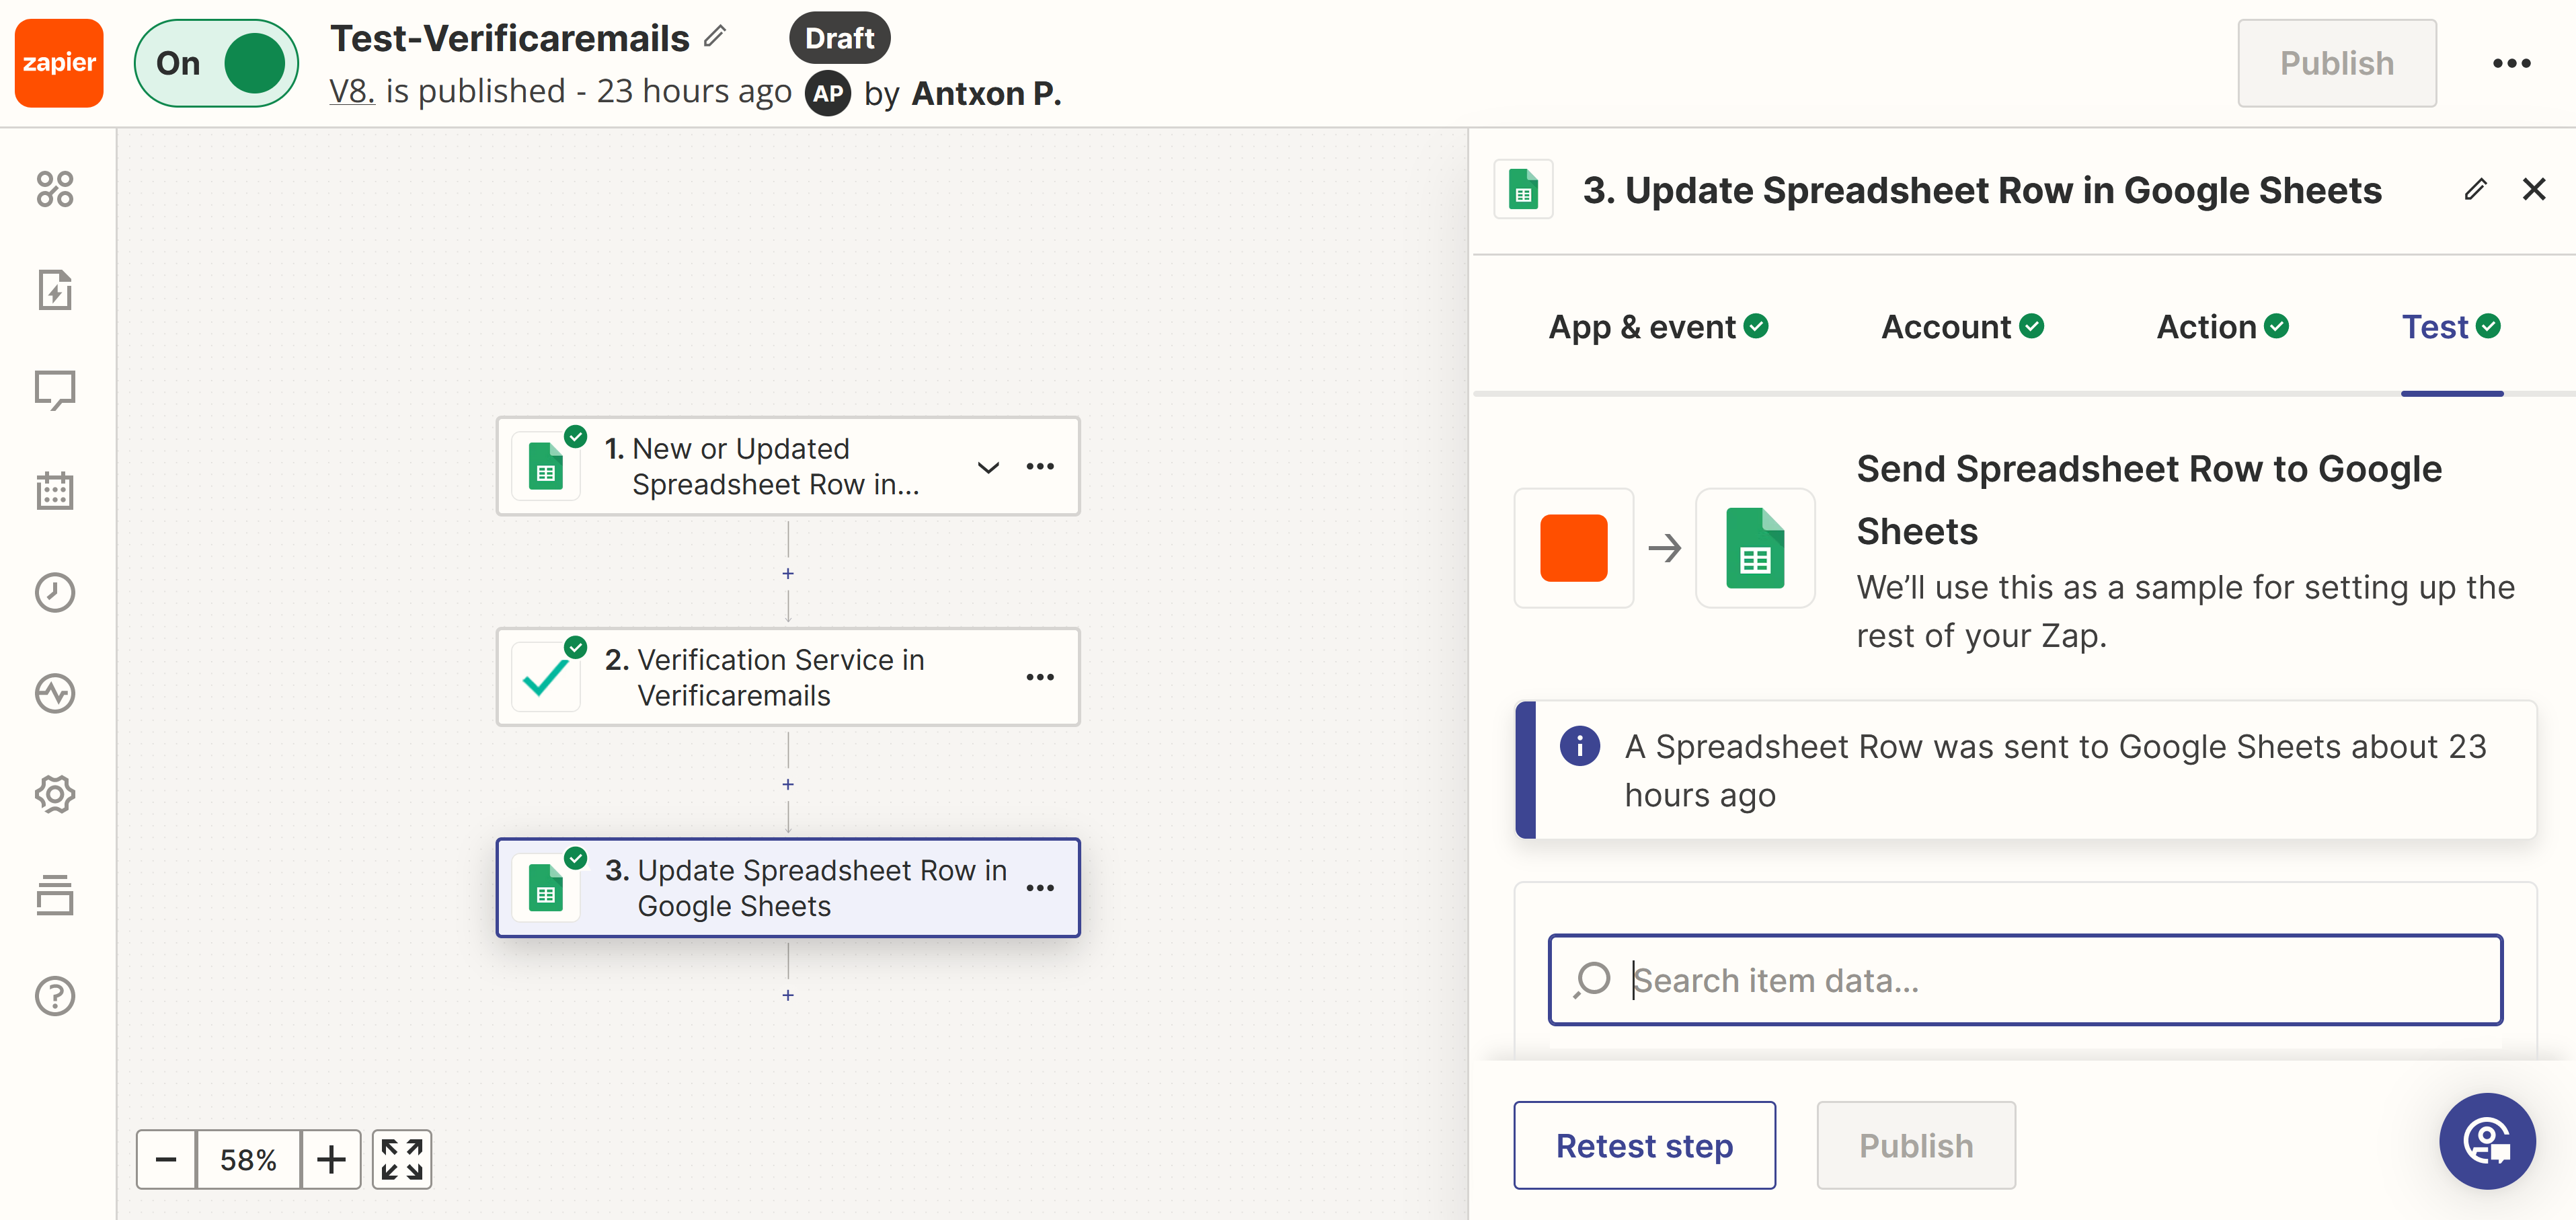
After verifying the configuration through a test, click on “Publish” to complete the process. Now you can use Zapier to verify email addresses in Google Sheets automatically.

Step 16: Activate your Zap to verify mailing addresses.

Activate the Zap

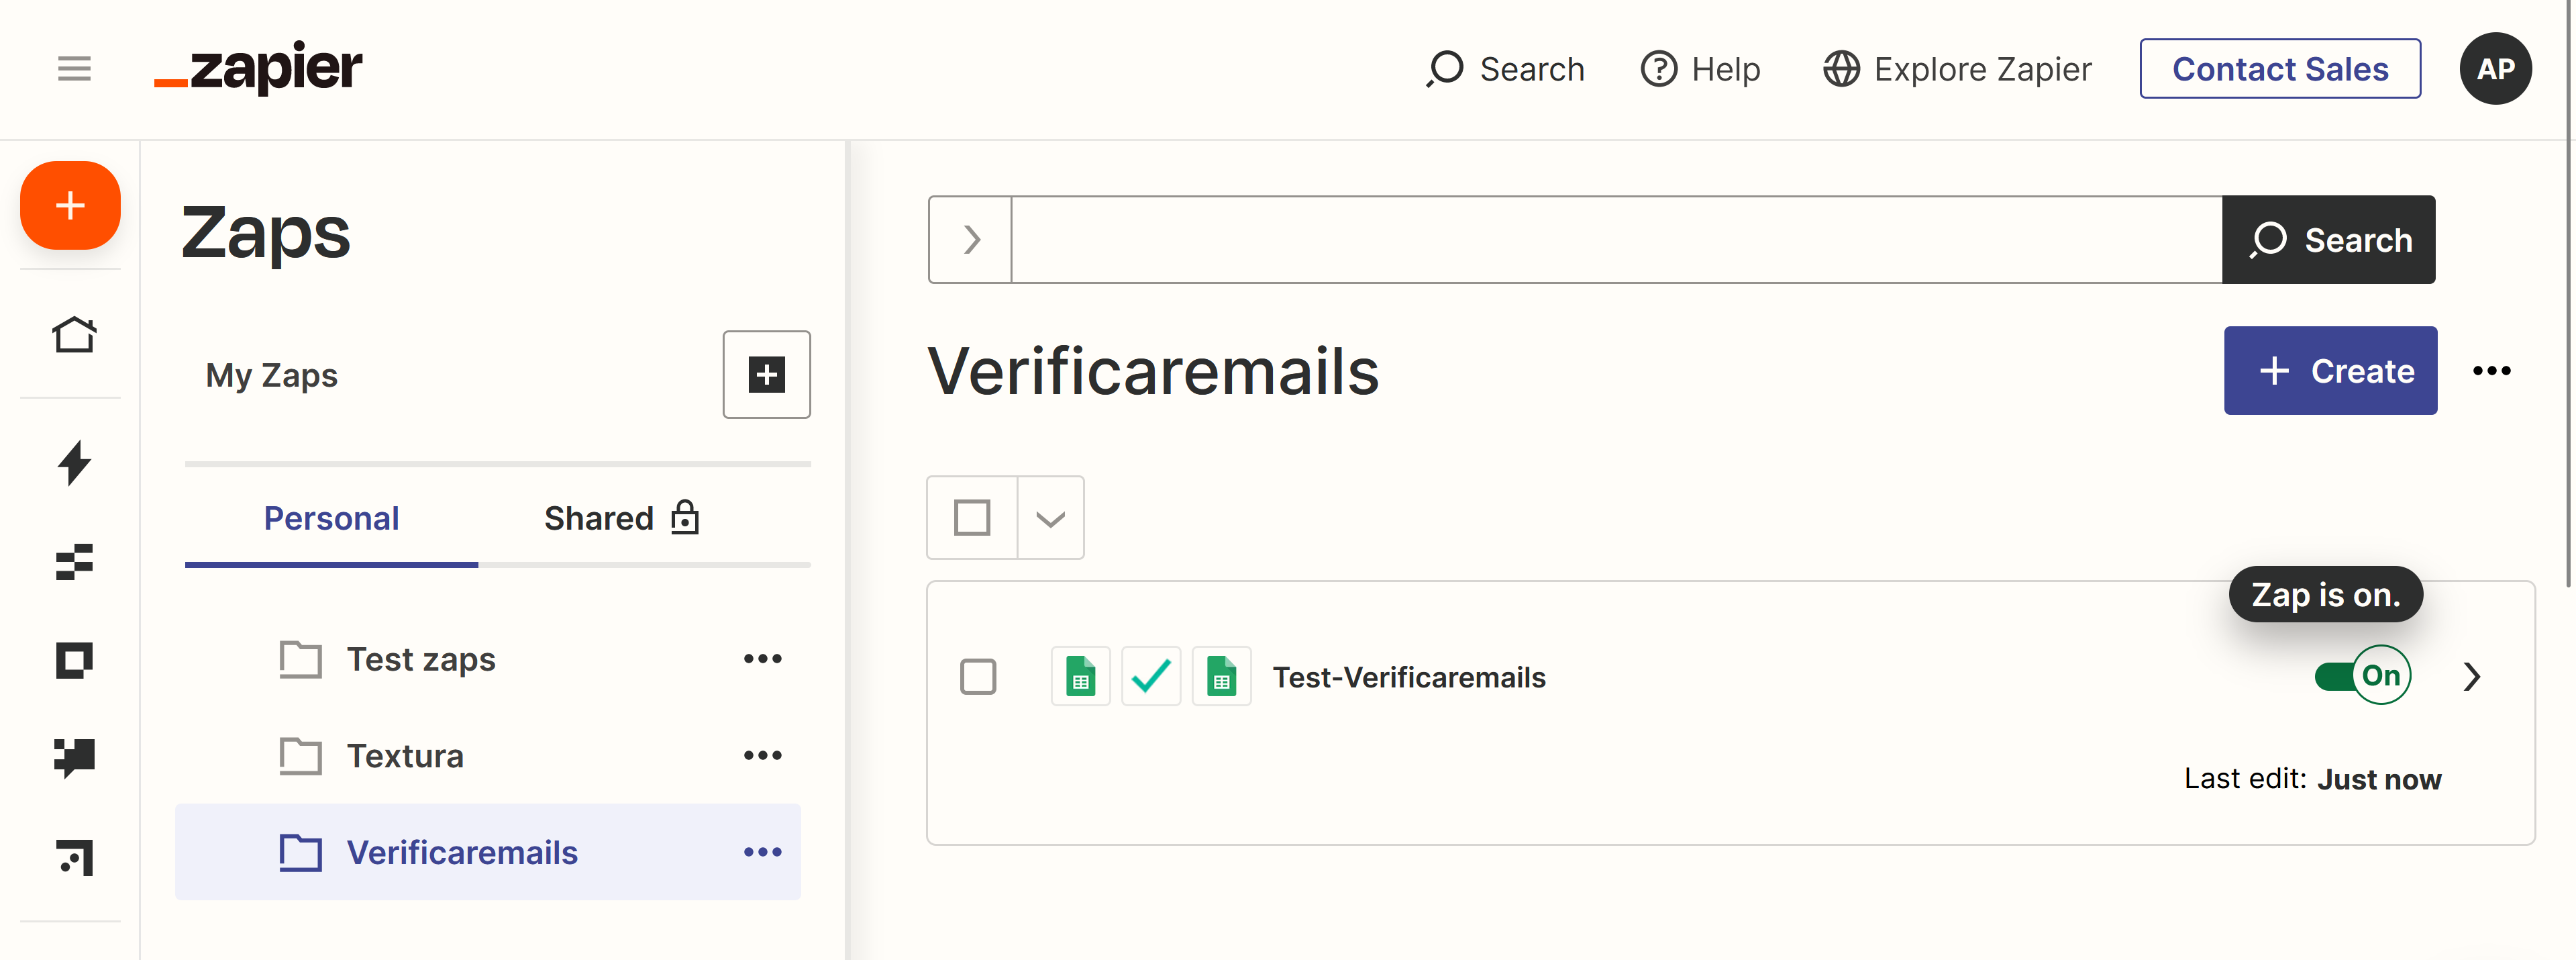
At this point, you can enable your Zap. Tap the button to start it up. By moving the selector to “On”.

Step 17: Conduct a manual test.

To check if everything is in order, add a new entry in the email column of your spreadsheet. Then, log in to the Zapier control panel to verify your Zaps. By clicking on the drop-down menu next to the “ON” button, check for any errors. If there are no errors, it means that your Zap has been configured correctly. Then go back to your spreadsheet to check if the results have been synchronized in the corresponding column and row.

Verification test

Don’t forget that the method of using Zapier to verify emails in Google Sheets and Verifyemails to clean up mailing lists is just one of the many ways to verify your emails. However, the basic principles remain the same. Zapier’s library for verifying email addresses has more than 1000 apps, which means there is a high probability that they are compatible with the CRM or ERP you are using. Check out the full list of supported applications and feel free to check your emails with Zapier.

Explore the countless possibilities Zapier offers with creativity. If you have any questions, our live support team will be happy to help you.

Remember that our Zap not only allows you to use Zapier to verify email addresses, but also to validate phone numbers, verify names or verify postal addresses.

Para poder utilizar Verificaremails con Zapier, es necesario cumplir con ciertos requisitos.

Antes de comenzar, necesitarás los siguientes elementos:

  1. Regístrate de forma gratuita en Zapier. Aunque algunas características estarán limitadas, en este artículo te guiaremos para crear un Zap que funcione con una cuenta gratuita de Zapier.
  2. Dentro de tu cuenta de Verificaremails, revisa la sección de API para crear una clave de API para el servicio de verificación de direcciones de correo.
  3. Para nuestro Zap, se requiere una cuenta de Google y una hoja de cálculo de Google Sheets. Al iniciar, deberás configurar una serie de columnas con encabezados.
  4. Punto de destino para correos electrónicos: Aquí es donde Zapier recibirá los mensajes electrónicos.
Con estas credenciales ya puedes empezar a crear tu Zap y utilizar Zapier para verificar emails en Google Sheets.
 
Google Shhet para verificar emails

A continuación, te mostraremos cómo crear un Zap paso a paso entre Verificaremails y Google Sheets.

En primer lugar, para empezar, deberás iniciar sesión en tu cuenta de Zapier.

Paso 1: Inicia sesión con tus datos de acceso en tu cuenta de Zapier para verificar emails.

Para crear tu Zap, haz clic en el ícono “+” en la esquina superior izquierda de la página y luego selecciona “+ Create”.

Paso 1 - Creación del Zap

Paso 2: Asigne un nombre a su Zap

Para identificar tu Zap ponle un nombre que sea identificativo del servicio que integras. Haz clic en «Untitled Zap» para añadir el nombre del Zap.

Paso 3: Establecer el “Trigger” para que se active la respuesta.

Para comenzar, vaya a la sección “What would you like to automate?”, luego haga clic en “Google Sheets”. Si no aparece, escriba “Google Sheets” en el campo y selecciónela de la lista.

Paso 3 - Establecer aplicación trigger Zapier

A continuación, elija la opción “New or Update Spreadsheet Row” como el evento que activará su Zap. Haga clic en “Continue”.

Establecer evento en Zapier

Paso 4: Vincular nuestro zap con una cuenta de Google Sheets y poder utilizar Zapier para verificar emails

Para comenzar, pulsa en “Choose account” y sigue los pasos para ingresar tus credenciales de Google. Después, otorga a Zapier permiso para acceder a tus hojas de cálculo de Google.

Zapier vincular cuenta

Paso 5: Selecciona la hoja de cálculo y la columna de correo electrónico

Elige el archivo de hoja de cálculo que quieras utilizar. Para hacerlo, haz clic en el ícono desplegable junto al espacio de la hoja de cálculo y selecciona la que prefieras. El sistema mostrará automáticamente todas las hojas de cálculo que hayas guardado en Google Drive.

Una vez que hayas seleccionado la hoja de cálculo deseada, elige la columna que contiene las direcciones de correo electrónico en tu hoja de cálculo (verifica esto en la columna de Trigger). Luego, haz clic en “Continue”. En nuestro caso, la columna que contiene las direcciones de correo se llama “Emails”.

Zapier - Seleccionar hoja google Sheet

Paso 6: Para lograr una conexión exitosa, es importante dedicar tiempo al experimento y evaluar los resultados de manera minuciosa. Realice los ajustes necesarios y continúe evaluando los resultados obtenidos. Siga adelante hasta alcanzar el resultado deseado.

Zapier - Test connection

Al elegir “Search new records”, Zapier se conecta con la hoja de cálculo de Google seleccionada y busca los registros de la columna “Emails” que contienen las direcciones de correo que queremos verificar. Debes seleccionar uno como ejemplo. Selecciona “Continuar con el registro seleccionado”. Si todo está correcto, se mostrará la sección de Acción. En caso de que haya algún error, aparecerá un mensaje de alerta. En ese caso, revisa la configuración de los pasos anteriores, realiza las correcciones necesarias y vuelve a realizar la prueba. Una vez que la configuración sea correcta, haz clic en “Continue”.

Paso 7: Pasar a la acción. Debemos definir qué acción queremos realizar sobre los datos del paso anterior, que contiene las direcciones de correo a verificar.

Una vez que el sistema sabe qué hoja de cálculo debe utilizar y dónde buscar cambios o nuevos correos electrónicos, todo lo que necesitas hacer es informarle qué hacer con la información actualizada. En la sección “Choose action”, busca “Verificaremails” y selecciona la aplicación.

Zap Verificaremails

Una vez seleccionada, lo que debemos hacer es seleccionar el tipo de evento que vamos a utilizar para la verificación de nuestros contactos

Zapier - Verification services

Paso 8: El último paso es conectar la cuenta de Verificaremails que se ha creado previamente.

Pulsa en «Continue» y luego en «+Connect a new account». Introduce después la clave de tu API (la puedes generar en la sección API de tu cuenta en Verificaremails). Por último, escoge «Yes, continue to Verificaremails».

Credenciales Zapier Verificaremails

Estas credenciales las encontraremos en nuestra cuenta de Verificaremails.com en la sección de APIs. Recuerda que cada servicio tiene su propia API. Para poder utilizar todos los servicios de verificación en un mismo Zap puedes editar el campo “Token” para cada una de las API y utilizar las mismas credenciales entre todos los servicios.

Credenciales Verificaremails API

Paso 9: Establecer la plantilla. La creación de una plantilla normalizada para el proyecto es el penúltimo paso del proceso. Esta plantilla servirá de base para todo el proyecto y debe incluir toda la información y los parámetros necesarios. 

Google Sheet - Verificación Emails

Para comenzar, selecciona la columna con las direcciones de correo electrónico desde tu hoja de cálculo pulsando en “Emails”. Después, haz clic en “Continue”.

Zapier - Columna de Google Sheet a verificar

Paso 10: Hay que hacer una comprobación para comprobar que la fuente de datos esta conectada al servicio de verificación..

Test Verificaremails conexión

En la imagen inferior podeis ver la respuesta del mail verificado.

Respuesta verificación de direcciones de correo con Verificaremails

Antes de proceder, el sistema mostrará una pantalla para verificar la configuración. Por favor, verifica el campo principal para la dirección de correo electrónico. Luego, pulsa en “Retest step”. El sistema realizará una verificación de la configuración. Si todo está correcto, aparecerá un mensaje indicando que la prueba fue exitosa y se mostrará el resultado de la verificación en la dirección de correo electrónico verificada. Si la prueba fue exitosa, haz clic en “Publicar”.

Paso 11: Activa tu Zap. Cuando llegues al punto de activación de tu Zap, se requiere un paso adicional para prepararlo para su uso. Ve hacia la parte inferior de la página y haz clic en el icono “+” para agregar una nueva acción que devolverá los resultados de la verificación a la hoja de cálculo de Google.

Paso nueva acción zapier

Paso 12: Se debe definir una respuesta a los resultados obtenidos.

Una vez más, necesitarás seleccionar una aplicación para llevar a cabo la tarea seleccionada. Ahora verás “Google Sheets” en las aplicaciones disponibles. Haz clic en “Google Sheets” y escoge “Update Spreadsheet Row”. Después, pulsa en “Continue”.

Zapier acción actualizar resultados

Paso13: Se debe crear una nueva configuración para la cuenta de Google Sheets.


Verás que tu cuenta de Google ya ha sido seleccionada. No es necesario que vuelvas a iniciar sesión. Solo tienes que hacer clic en «Continue» ya que vamos a guardar los datos de los emails verificados en la misma hoha de cálcula de la que hemos obtenido los emails.

Paso 14: Elegir la hoja de cálculo y las columnas para mostrar los resultados

Vincular resultados Zapier

En el paso 6, seleccionamos la hoja de calculo y la hoja de trabajo. Después, en la fila, hay que seleccionar la opción «Personalizado» y buscar el icono desplegable debajo de «Fila de hoja de calculo nueva o actualizada en Google Sheets» y elegir «Row ID» de la lista. Después, hay que bajar para observar los campos creados en las hojas de cálculo para los resultados de verificación (recordemos la columna de «Resultado de Validación» discutida en la sección «¿Qué necesitamos?»). Se debe hacer clic en cada campo para seleccionarlo (por ejemplo, el «Resultado de validación deseado»). Por último, hacer clic en «Continue».

Paso 15: Terminar la configuración mediante una prueba.

Terminar conexión Zapier

Tras verificar la configuración mediante una prueba, haz clic en «Publish» para completar el proceso. Ahora ya puedes utilizar Zapier para verificar drecciones de correo en Google Sheets de forma automática.

Paso 16: Activar su Zap para verificar direcciones de correo.

Activar el Zap

Al llegar a este punto, puedes habilitar tu Zap. Dale un toque al botón para que entre en funcionamiento. Moviendo el selector a “On”.

Paso 17: Llevar a cabo una prueba manual.

Para verificar si todo está en orden, agrega una nueva entrada en la columna de correo electrónico de tu hoja de cálculo. Luego, accede al panel de control de Zapier para verificar tus Zaps. Al hacer clic en el menú desplegable junto al botón “ON”, verifica si aparece algún error. Si no hay errores, significa que tu Zap se ha configurado correctamente. Después, regresa a tu hoja de cálculo para comprobar si los resultados se han sincronizado en la columna y fila correspondientes.

Prueba verificación

No olvides que el método de uso de Zapier para verificar emails en Google Sheets y Verificaremails para limpiar listas de correo es solo una de las muchas formas de verificar tus correos electrónicos. Sin embargo, los principios básicos siguen siendo los mismos. La biblioteca de Zapier para verificar direcciones de correo cuenta con más de 1000 aplicaciones, lo que significa que hay una alta probabilidad de que sean compatibles con el CRM o ERP que estés utilizando. Échale un vistazo a la lista completa de aplicaciones compatibles y siéntete libre de verificar tus correos electrónicos con Zapier.

Explora las innumerables posibilidades que Zapier ofrece con creatividad. Si tienes alguna pregunta, nuestro equipo de soporte en vivo estará encantado de ayudarte.

Recuerda que nuestro Zap no solo sirve para utilizar Zapier para verificar direcciones de correo, sino que también permite validarlas números de teléfono, verificar nombres o verificar direcciones postales.

Do you have a large file or need help?

We specialize in global phone verification +34 93 451 11 00

- IMPROVE THE QUALITY OF YOUR DATA IN A SIMPLE WAY -

VERIFY EMAILS
TELEPHONES,
POSTAL ADDRESSES
NAMES AND LAST NAMES...